Managing order data is the backbone of any eCommerce operation. When you need to perform a Shopify import orders task, whether migrating from another platform or centralizing sales channels, precision is paramount. A successful import ensures data continuity, accurate reporting, and a seamless operational workflow.
However, unlike importing products or customers, Shopify does not have a native, built-in feature to bulk import orders to Shopify using a simple CSV upload. This limitation often surprises store owners.
This guide provides a clear and authoritative path forward. We will explore the business-critical reasons for importing orders, detail the necessary data fields to prepare, and guide you through the proven methods for accurately and efficiently importing your historical and external order data into Shopify.
Why You Should Import Orders into Shopify?
Learning how to import orders into Shopify is more than an administrative task; it’s a strategic move to create a single source of truth for your business. Centralizing this data unlocks operational efficiencies and deeper business insights that are otherwise impossible to achieve.
Migrating your business from another eCommerce platform
When moving from a platform like Magento, WooCommerce, or BigCommerce, bringing your order history is crucial.
- Customer Service Continuity: It allows your support team to look up past purchases, handle inquiries, and process returns without needing to access the old system.
- Accurate Customer Profiles: Linking past orders to customer accounts provides a complete view of their lifetime value and purchase behavior.
- Historical Reporting: Having all your sales data in one place is essential for accurate, long-term financial reporting and business analysis within Shopify.
Consolidating marketplace orders (Amazon, eBay, Etsy) with Shopify data
Many businesses sell across multiple channels. A Shopify import orders process allows you to unify this fragmented data. Imagine your data shifting from a scattered, multi-system view to a streamlined, single-dashboard perspective in Shopify. This consolidation gives you a holistic view of sales performance, inventory velocity, and customer behavior across all channels.
Fulfilling external orders through Shopify
You can use Shopify’s robust ecosystem to manage fulfillment for orders that didn’t originate on your website. By importing orders from a trade show, a wholesale deal, or a social media sale, you can leverage your existing Shopify shipping setup, inventory tracking, and fulfillment apps to process them efficiently.
Bulk updating or correcting historical order information
Sometimes you need to modify existing orders in bulk, a task that is tedious to do one by one. An export-and-import workflow using a dedicated app can help you:
- Add or change order tags for better organization.
- Update fulfillment details or tracking numbers.
- Correct errors in customer information tied to past orders.
Check out this quick guide on how to import orders into Shopify using BulkFlow:
Understanding the Shopify Import Orders File: Available Columns & Fields
To effectively import orders into Shopify, your data must be perfectly structured. While Shopify doesn’t offer a native CSV upload for orders, third-party import apps have become the industry standard. These apps rely on a meticulously prepared CSV or Excel file.
Below are the common fields these tools require. Preparing your data with these columns in mind will ensure a smooth import.
Basic order details
These fields identify the order and its current status within your workflow.
| Column Header | Description | Example |
| Name or Order Number | Required. The unique identifier for the order (e.g., #1001). Must include the prefix if you use one. | #1001 |
| Financial Status | The payment status of the order. | paid, pending, refunded |
| Fulfillment Status | The shipping status of the order. | fulfilled, unfulfilled, partial |
| Processed At | The date and time the order was placed. | 2024-10-26 10:30:00 -0500 |
Customer information
This data links the order to the correct customer. If the customer doesn’t exist, the import process will typically create them.
- Email: The customer’s email address.
- Shipping Name: Full name for the shipping address.
- Shipping Address: Street address.
- Shipping City: City.
- Shipping Province Code: Two-letter state/province code (e.g., CA).
- Shipping Country Code: Two-letter country code (e.g., US).
- Shipping Zip: Postal/Zip code.
Line items
These columns detail the specific products included in the order. Each line item in an order will often be a separate row in your CSV, all sharing the same Order Number.
| Column Header | Description | Example |
| Lineitem Sku | The SKU of the product. This is crucial for linking to your existing Shopify products. | TSHIRT-RED-L |
| Line Item Quantity | The number of units of the product sold. | 2 |
| Lineitem Price | The price per unit of the product. | 24.99 |
| Lineitem Title | The name of the product. | Red T-Shirt – Large |
Transaction data
This records the payment details for accurate financial reconciliation.
- Gateway: The payment method used (e.g., stripe, paypal, or manual).
- Amount: The total transaction amount.
- Status: The result of the transaction (e.g., success, failure).
Fulfillment details
If the orders have already been shipped, you can import this information as well.
- Fulfillment Tracking Number: The tracking number from the carrier.
- Fulfillment Tracking Company: The name of the shipping carrier (e.g., USPS, FedEx).
- Fulfillment Location: The name of the Shopify Location the order was fulfilled from.
Optional columns
These fields allow you to add more context to your orders.
- Discounts: The discount code applied and the amount.
- Taxes: The name and amount of tax applied.
- Notes: Any internal notes associated with the order.
- Tags: Comma-separated tags for filtering (e.g., migration, wholesale).
2 Ways to Manually Import Orders to Shopify
If you only have a handful of orders to enter, or if your orders are coming from specific, supported marketplaces, you have a couple of manual options that don’t require a CSV file.
Method 1: Manual order creation in the Shopify admin
This method is for entering a single order at a time. It is not a bulk import solution, but is useful for creating one-off orders for phone or in-person sales.
- From your Shopify admin, go to Orders.
- Click the Create order button on the top right.
- In the order creation screen, search for and add products from your catalog.
- Search for an existing customer or create a new one on the fly.
- Enter payment details, add shipping, and apply any taxes.
- Once complete, you can either Mark as paid (if payment was taken externally) or send an invoice to the customer.
Method 2: Using the LitCommerce app for linked marketplaces
If your goal is to consolidate orders from major marketplaces like eBay, Etsy, TikTok Shop, or Walmart, the LitCommerce app is the designed solution. It doesn’t import orders to Shopify in a historical, bulk sense, but rather syncs new orders as they come in.
It works by linking your Shopify store directly to your marketplace seller account. When a sale occurs on the marketplace, the app automatically creates the corresponding order in your Shopify admin, allowing you to manage and fulfill it centrally. This is an automated sync, not a manual import.
How to Import Orders into Shopify in Bulk with BulkFlow?
If you’re managing large order data, Shopify import orders can save you hours of manual entry. BulkFlow – Files Import & Export makes this process simple and efficient.
In this guide, we’ll walk you through 6 easy steps to bulk import orders into Shopify using BulkFlow, especially if you want to learn how to Shopify import orders from CSV.
Step 1: Install BulkFlow for your Shopify store
The first step is to connect your store to BulkFlow.
- Go to the Shopify App Store and search for BulkFlow.
- Click Install and approve the app permissions so BulkFlow can access your store data.
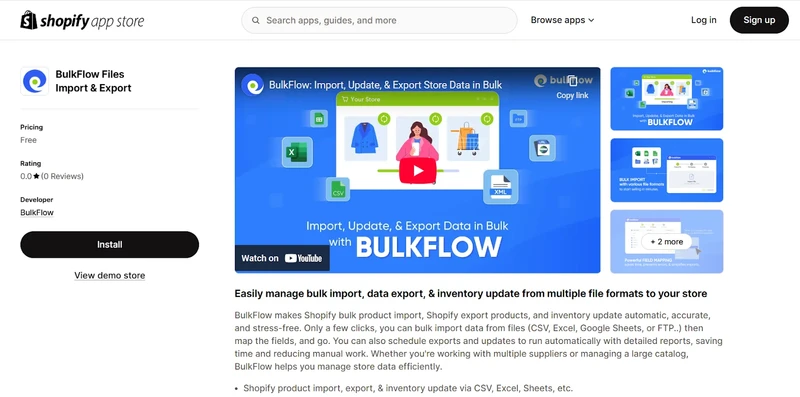
Once installed, you’ll be redirected to the BulkFlow dashboard, ready to start importing your order data.
Step 2: Prepare your Shopify import orders file
1. In the BulkFlow dashboard, click Download Templates and select Orders Template.
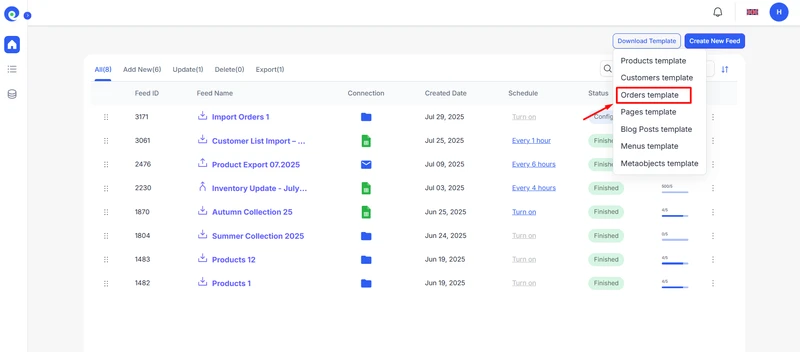
2. Open the file and fill in the order details, including order numbers, customer information, products, quantities, prices, fulfillment status, and tags.
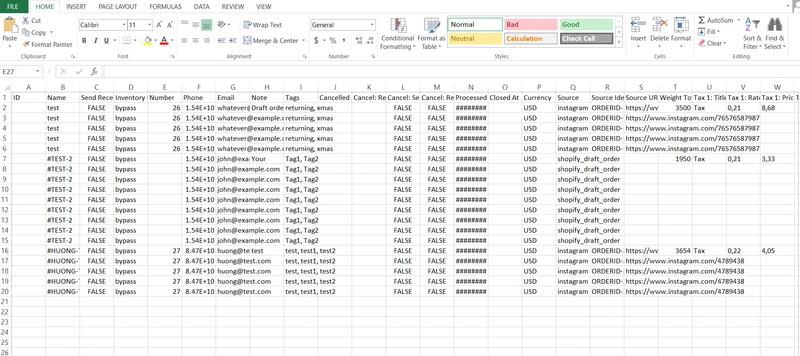
Need to upload products too? Check out our Shopify product import guide to learn how to bulk add products with BulkFlow.
Step 3: Create a feed for Shopify import orders
With your file ready, you need to create a new feed in BulkFlow to define how your data will be imported.
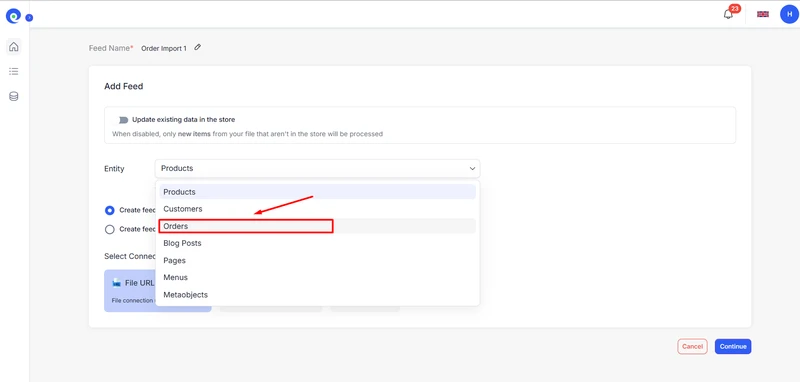
1. From the BulkFlow home screen, click Create New Feed → Add New.
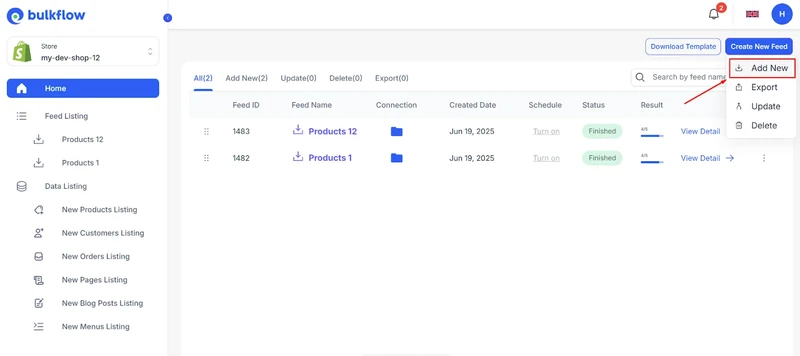
2. Give your feed a name, like “Order Import 1.”
3. Select Orders as your data entity (BulkFlow also supports Customers, Products, Blog Posts, and more).
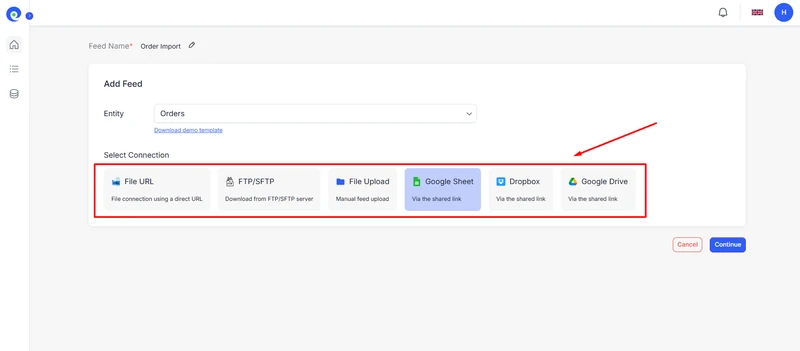
Next, select how to connect your file:
- File URL
- FTP/SFTP
- File Upload
- Google Sheets (ideal for automated imports)
- Dropbox
- Google Drive
Step 4: Add your order file
Now it’s time to upload your Shopify import orders file. In this step, BulkFlow will display connection options based on the method you selected.
- Google Sheets or File URL: Paste the shared link to your order data source, then click “Test Connection” to confirm that BulkFlow can access your file.
- FTP/SFTP: Provide your connection details, including:
- Username and Password
- Server Address (e.g., ftp.example.com)
- Directory Path (e.g., /file/data/)
- File Upload: Simply drag and drop your CSV or Excel order file into BulkFlow.
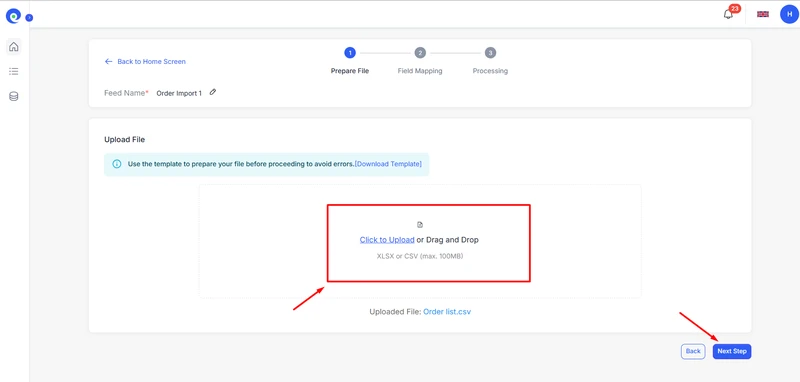
Once finished, click Next step, and BulkFlow will process your file. You’ll then be taken to the Field Mapping page, where you can preview how each import data will be shown with Shopify’s fields. This step ensures that all your order data is imported correctly.
Step 5: Run and automate the Shopify order import
With your feed configured, you’re ready to import your orders into Shopify. Click Next Step to begin the import process. BulkFlow will handle the data transfer and process your orders in the background.
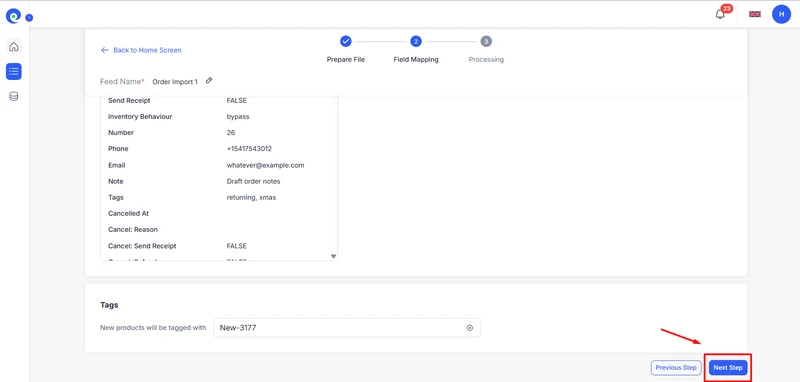
Once the import is complete, you’ll receive a success notification confirming that your orders have been added to your store.
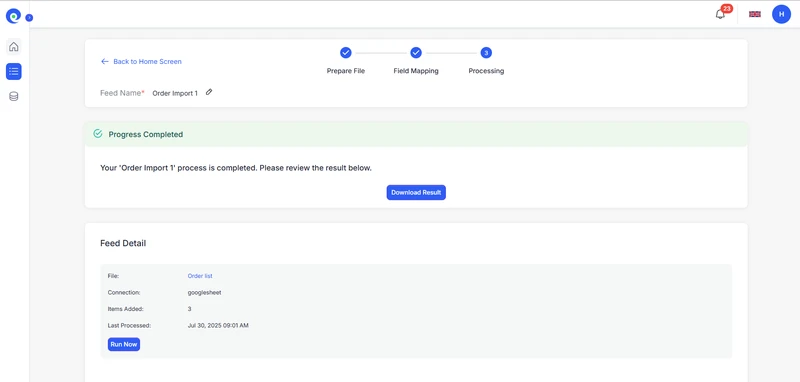
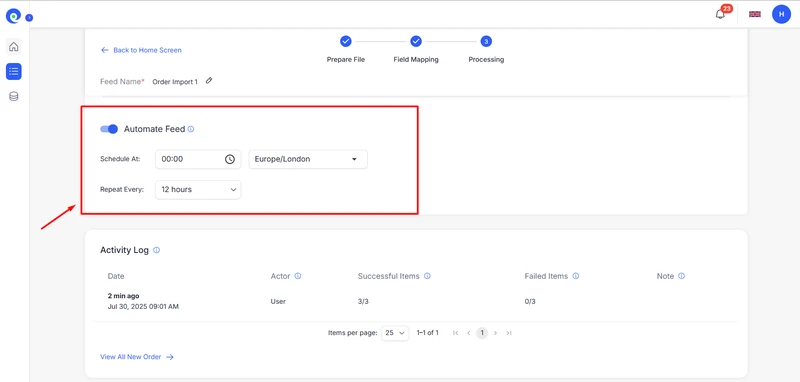
If you’re using a shared connection (Google Sheets, FTP, or URL), you can also Automate Feed to schedule imports. For example, automate new orders every hour or at specific times to keep your store up to date.
Step 6: Review your imported orders
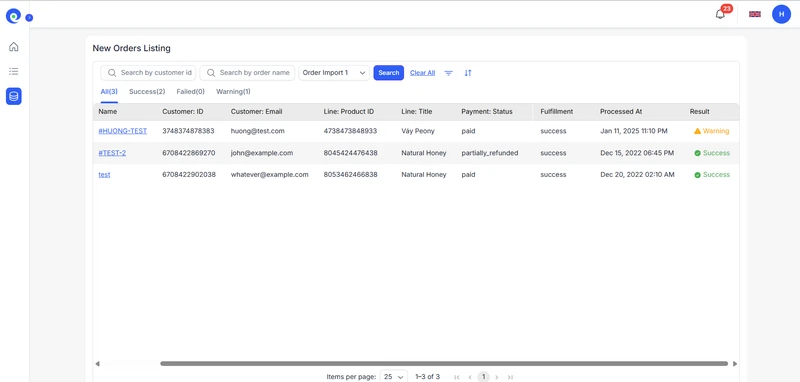
Once your import is complete, BulkFlow makes it easy to review and manage all newly added data.
- Scroll down to the Activity Log to see imported orders.
- Click View All Imported Orders to confirm the data.
- If any orders fail to import, hover over the Failed icon for detailed error messages and resolve the issues.
And that’s it! You’ve just learned how to bulk import orders into Shopify using BulkFlow. Whether you’re migrating from another platform or updating bulk order data, BulkFlow makes Shopify import orders quick, reliable, and scalable.
Shopify Import Orders – FAQs
Can you import orders into Shopify?
Yes, but not natively with a CSV file through the standard Shopify admin. You can either create orders manually one by one, use an app like Marketplace Connect or LitCommerce to sync from specific marketplaces, or use a third-party importer app like BulkFlow to bulk import orders from a CSV or Excel file.
Can I import orders using a CSV file?
Yes, but only by using a specialized third-party app like BulkFlow from the Shopify App Store. These apps are designed to read your Shopify import orders CSV file, map the columns to Shopify’s data structure, and create the orders in bulk.
How do I bulk import orders into Shopify?
You can bulk import orders into Shopify easily with BulkFlow by following 6 steps below:
Step 1: Install BulkFlow for your Shopify store
Step 2: Prepare your orders file with the BulkFlow template
Step 3: Create a new feed for Shopify import orders
Step 4: Add your order file
Step 5: Run & automate the Shopify order import
Step 6: Review & manage imported orders
Can I migrate orders from another platform, like Magento or BigCommerce, to Shopify?
Absolutely. Migrating order history is a primary reason to use an import app. Export your orders from Magento or BigCommerce, format the data according to the app’s template, and then use the BulkFlow – Files Import & Export tool to import it into Shopify.
How do I handle taxes and shipping when importing orders?
Your CSV file should contain columns for tax amounts, tax names, shipping costs, and shipping method. A good import app will use this data to create the order with the correct financial and shipping details. You must ensure the tax amounts are pre-calculated in your file.
Will importing orders affect my inventory levels?
This depends on the app and its settings. Most professional import apps give you the option to choose whether the import should affect inventory. You can typically set it to reduce stock levels for the imported products or to ignore inventory adjustments, which is useful for historical orders where inventory has already been accounted for.
What are the most common errors during an order import?
The most common errors include: mismatched SKUs (the SKU in your file doesn’t exist in Shopify), incorrectly formatted dates, invalid customer email addresses, and improper column headers in the source file. Running a test import is the best way to catch these issues early.
Are there file size limitations for importing orders?
While Shopify itself doesn’t have a limit (since it has no native importer), the third-party apps you use might. Most robust apps can handle files with tens or even hundreds of thousands of orders, though they may split them into smaller batches to process them reliably. Check your specific app’s documentation for any limits.
Final Thoughts
So, what’s the easiest way to handle Shopify import orders? As you’ve seen in this guide, BulkFlow makes the process quick and stress-free. Whether you’re bringing in orders from another platform or updating order details in bulk, BulkFlow gives you the tools to get it done with ease.
Shopify’s built-in options are sufficient for basic needs, but they may be limited if you’re dealing with large files or more complex data. BulkFlow simplifies tasks by allowing you to work with larger files, various formats, and even set up automatic imports on a schedule. This means you can keep your Shopify store up to date without having to do everything manually.
If you’re looking for a simple yet powerful way to manage your orders, BulkFlow is a great choice. Stop wasting time on manual uploads – start using BulkFlow and make importing orders to BulkFlow fast and easy.


