Shopify export orders is a powerful feature that allows store owners to easily download and manage their order data outside of the Shopify platform. Whether you need to keep accurate records, streamline your accounting, or optimize your inventory and fulfillment processes, exporting orders from Shopify is essential.
With the right export methods, you can save time and reduce errors caused by manual data entry. In this guide, we will walk you step-by-step through how to export orders via 2 different methods.
What Are the Benefits of Shopify Order Export
Shopify export orders offer more than just moving data; they provide valuable opportunities to improve various business operations, such as inventory management and order fulfillment. Additionally, exporting orders helps protect important information, including customer details, sales records, and transaction histories.
Streamlined financial processes
Exported orders serve as a foundational dataset for bookkeeping and financial reporting. By transferring order data into accounting software or spreadsheets regularly, you ensure accurate revenue tracking, tax calculations, and timely reconciliation. This reduces manual data entry errors and saves accountants’ time during busy periods.
Enhanced customer service
With order exports, customer support teams can quickly access detailed data like purchase histories, shipment statuses, and payment information outside the Shopify admin. This speeds up response times and improves accuracy when addressing inquiries, returns, or order modifications.
Data security and backup
Regularly exporting and securely storing your order data creates essential backup copies in case of accidental deletion, system errors, or cyberattacks. Having these backups mitigates risks and ensures business continuity. Additionally, exporting orders enables compliance with data retention policies and audits by maintaining easy access to historical records.
Method #1: How to Use Default Tool for Shopify Export Orders
Shopify’s built-in export feature is straightforward, making it easy for store owners to export orders from Shopify quickly.
Here’s how to export Shopify orders using Shopify’s native tool in a few simple steps:
- Log in to your Shopify admin and go to the Orders section.
- Select all orders you want to export and apply filters if needed. Click the Export button at the top right.
- Configure the settings and click Export orders to begin Shopify CSV export orders.
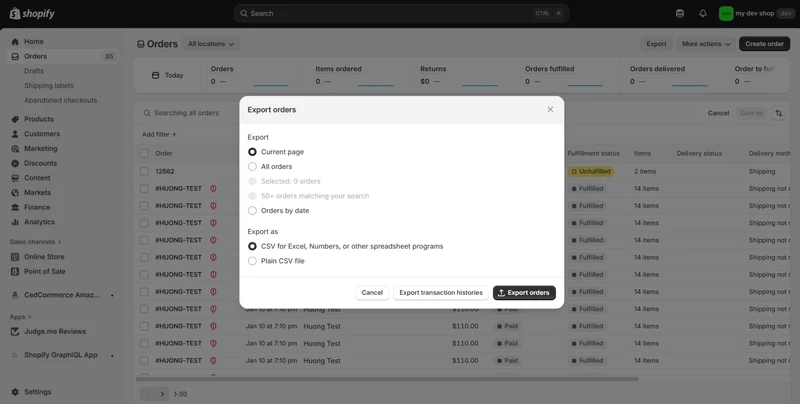
Some pros and cons of Shopify’s default tool
Pros:
- Free and included with every Shopify store.
- Easy to access and use without installing any apps.
- Exports order data quickly in a widely compatible CSV format.
- Allows basic filtering to export only relevant orders.
Cons:
- Limited customization of exported data fields: you get default order information only.
- Exports must be done manually unless combined with other automation tools.
- Handling large order volumes might require more processing time.
Method #2: How to Use BulkFlow for Shopify Export Orders
While Shopify’s default export tool has its benefits, it also comes with lots of limitations. For store owners who need more flexibility and efficiency, using a third-party app is highly recommended. Among these, BulkFlow is one of the best options.
BulkFlow offers several powerful benefits. It doesn’t just let you filter orders to export, but also allows you to tailor which order details to include. Additionally, BulkFlow allows Shopify export orders automatically according to your desired schedule, helping you keep your order data updated without manual intervention.
Other than order data, BulkFlow also supports not just exporting but also importing a wide variety of Shopify data types, such as importing customers, products, pages, discounts, and more. It even lets you import and export metafields and metaobjects, which are not supported by Shopify’s default.
Here are 4 steps to export orders using BulkFlow:
- Step 1: Set up Bulkflow app
- Step 2: Create a feed for order export Shopify
- Step 3: Configure and schedule export
- Step 4: Export and monitor order data
Step 1: Set up BulkFlow app
First, you need to connect your BulkFlow with your Shopify store. There are 2 methods:
- Method 1: Create a BulkFlow account. After signing up, click Connect under the Shopify icon.
- Method 2: Find BulkFlow on the Shopify App Store and install it. Upon installation, grant the necessary permissions so BulkFlow can access your store’s data and settings.
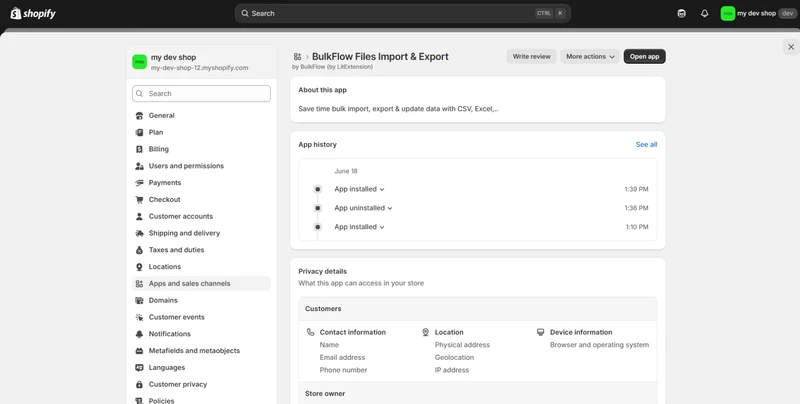
BulkFlow will automatically create a workspace for you, where you can manage all your feeds.
Step 2: Create a feed for order export Shopify
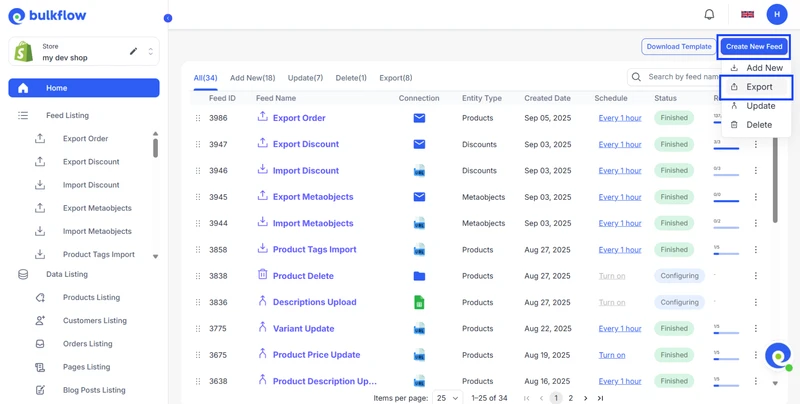
In the BulkFlow dashboard, make a new feed for Shopify order export by clicking Create New feed > Export.
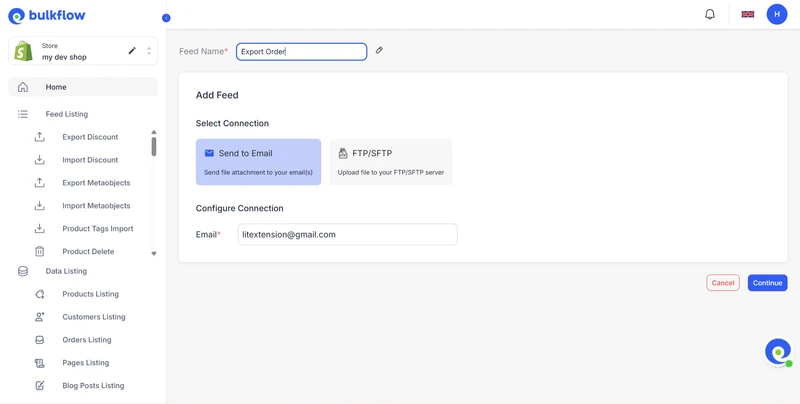
Here, you can set up your feed by giving it a distinctive name and choosing an export connection: Send to your email or upload to your FTP/SFTP server. When you’re done, click Continue to proceed.
Step 3: Configure and schedule export
In this step, you will fully configure your export feed by selecting exactly what data you want to export and setting up automation to keep your exports running smoothly.
Set export settings
There are two things you can customize in Export settings: Preset and Format.
BulkFlow allows you to save export setups as a preset and use them next time. These presets can save you significant time and effort by allowing you to reuse a pre-configured export setup instead of manually setting it up every time.
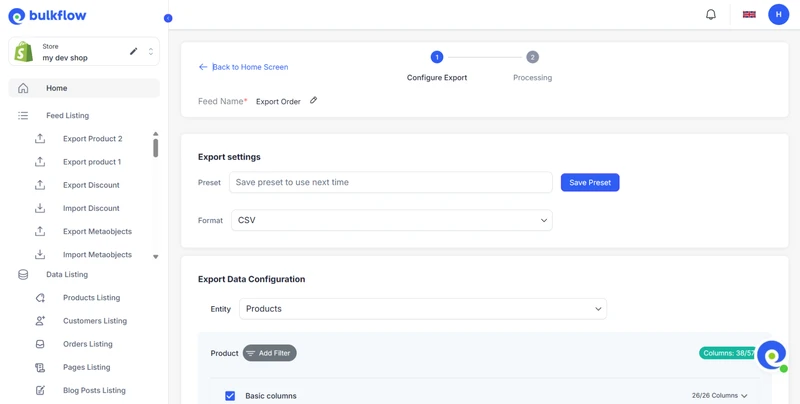
BulkFlow also provides flexibility in the export file format. You can choose between CSV files for compatibility with most tools or Excel files if you need enhanced formatting options.
Set up export data configuration
Next, you need to choose a data entity. BulkFlow allows you to export products, customers, blog posts,…, and of course, orders. To export orders, select Orders. Choosing Orders as the entity ensures that all exported data revolves around your store’s order records.
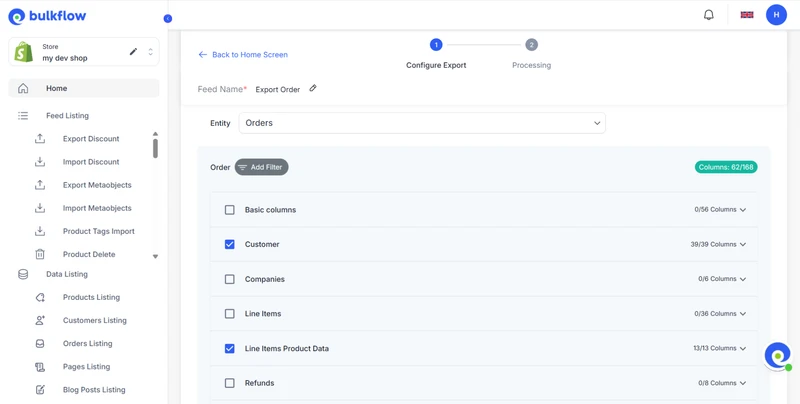
BulkFlow also offers you complete control over which order data to include in your export. This customization enables you to tailor the export file to perfectly suit your business needs, avoiding unnecessary data clutter.
Here are the details that you can select in your Shopify order export:
| Basic Columns | |||
| ID | Name | Send Receipt | Inventory Behaviour |
| Number | Phone | Note | |
| Tags | Created At | Updated At | Cancelled At |
| Cancel: Reason | Cancel: Send Receipt | Cancel: Refund | Processed At |
| Closed At | Currency | Source | Source Identifier |
| Source URL | Physical Location | User ID | Checkout ID |
| Cart Token | Token | Order Status URL | Weight Total |
| Price: Total Line Items | Price: Current Subtotal | Price: Subtotal | Tax 1: Title |
| Tax 1: Rate | Tax 1: Price | Tax 2: Title | Tax 2: Rate |
| Tax 2: Price | Tax 3: Title | Tax 3: Rate | Tax 3: Price |
| Tax: Included | Tax: Total | Price: Total Discount | Price: Total Shipping |
| Price: Current Total Duties | Price: Total Duties | Price: Current Total Fees | Price: Total Fees |
| Price: Total Refund | Price: Total Outstanding | Price: Current Total | Price: Total |
| Payment: Status | Order Fulfillment Status | Additional Details | Purchase Order Number |
| Customer | |||
| Customer: ID | Customer: Email | Customer: Phone | Customer: First Name |
| Customer: Last Name | Customer: Note | Customer: State | Customer: Tags |
| Customer: Email Marketing Status | Customer: SMS Marketing Status | Customer: Tax Exempt | Customer: Orders Count |
| Customer: Total Spent | Billing: First Name | Billing: Last Name | Billing: Name |
| Billing: Company | Billing: Phone | Billing: Address 1 | Billing: Address 2 |
| Billing: Zip | Billing: City | Billing: Province | Billing: Province Code |
| Billing: Country | Billing: Country Code | Shipping: First Name | Shipping: Last Name |
| Shipping: Name | Shipping: Company | Shipping: Phone | Shipping: Address 1 |
| Shipping: Address 2 | Shipping: Zip | Shipping: City | Shipping: Province |
| Shipping: Province Code | Shipping: Country | Shipping: Country Code | |
| Company | |||
| Company: ID | Company: Name | Company: External ID | Company: Location ID |
| Company: Location Name | Company: Location External ID | ||
| Line Items | |||
| Line: ID | Line: Product ID | Line: Product Handle | Line: Title |
| Line: Name | Line: Variant ID | Line: Variant Title | Line: SKU |
| Line: Quantity | Line: Price | Line: Discount | Line: Discount Allocation |
| Line: Discount per Item | Line: Total | Line: Grams | Line: Requires Shipping |
| Line: Vendor | Line: Properties | Line: Gift Card | Line: Force Gift Card |
| Line: Taxable | Line: Tax Total | Line: Tax 1 Title | Line: Tax 1 Rate |
| Line: Tax 1 Price | Line: Tax 2 Title | Line: Tax 2 Rate | Line: Tax 2 Price |
| Line: Tax 3 Title | Line: Tax 3 Rate | Line: Tax 3 Price | Line: Fulfillable Quantity |
| Line: Fulfillment Service | Line: Fulfillment Status | Line: Pre Tax Price | Line: Type |
| Line Items Product Data | |||
| Line: Product Type | Line: Product Tags | Line: Variant SKU | Line: Variant Barcode |
| Line: Variant Weight | Line: Variant Weight Unit | Line: Variant Inventory Qty | Line: Variant Cost |
| Line: Variant Price | Line: Variant Compare At Price | Line: Variant Country of Origin | Line: Variant Province of Origin |
| Line: Variant HS Code | |||
| Refund | |||
| Refund: ID | Refund: Created At | Refund: Note | Refund: Restock |
| Refund: Restock Type | Refund: Restock Location | Refund: Send Receipt | Refund: Generate Transaction |
| Fulfillment | |||
| Fulfillment: ID | Fulfillment: Status | Fulfillment: Created At | Fulfillment: Updated At |
| Fulfillment: Tracking Company | Fulfillment: Location | Fulfillment: Shipment Status | Fulfillment: Tracking Number |
| Fulfillment: Tracking URL | Fulfillment: Send Receipt | ||
Additionally, you can apply various filters to narrow your export to specific orders. This ensures that you only work with relevant order records, making analysis and processing much easier. Filters that BulkFlow supports you to export include:
- ID
- Name
- Created At
- Updated At
- Processed At
- Tags
- Payment Status
- Fulfillment Status
- Discount Code
- Payment Gateway
- Source
- Status
Set up automate feed
One of BulkFlow’s powerful features is the ability to schedule Shopify export orders to run automatically at your preferred time and frequency.
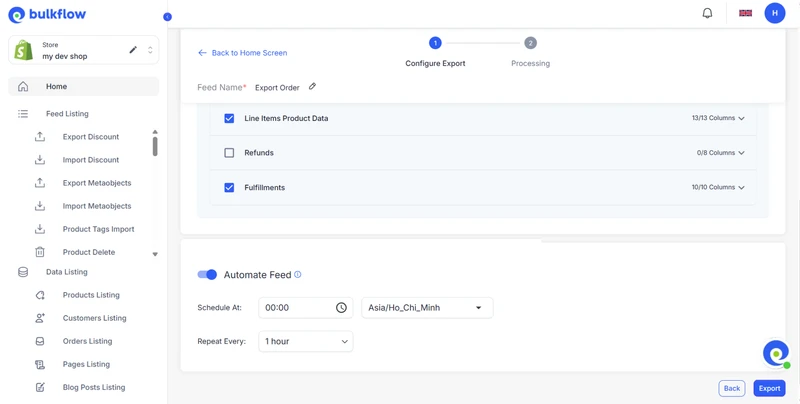
This automation reduces the need for manual exports and ensures you always have the latest order data.
Step 4: Export and monitor order data
When everything is set up, press Export to start exporting. After you export Shopify orders, you will receive a notification to tell you whether the process is completed.
If you have chosen an export connection as email, you can check your Shopify orders export file sent to your email and download it to your computer.
In the result page, BulkFlow also allows you to adjust your export schedule to further suit your needs. You can also check order results in the Activity Log.
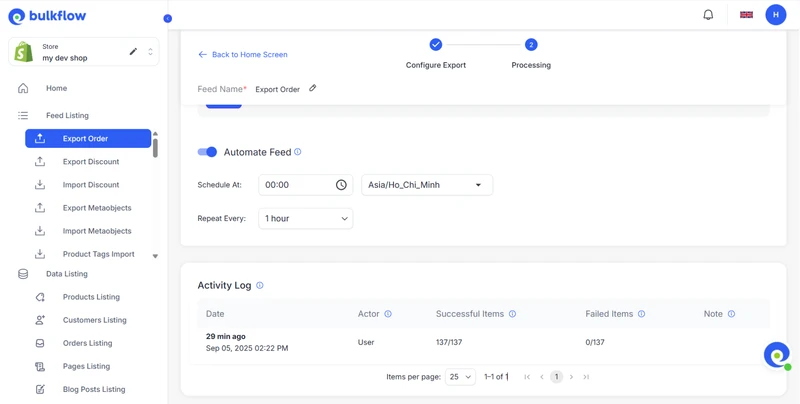
The number of orders that have been exported successfully will be shown in the Successful item columns. For unsuccessful ones, you can view them in the Failed Items column.
Best Practices to Export Shopify Orders
To maximize the effectiveness of every time you export orders from Shopify, it’s important to follow practices that can improve order data and overall workflow efficiency. Tools like BulkFlow can make many of these practices easier to implement and maintain.
Filter and customize export data
Before exporting, use Shopify’s filtering options to narrow your data by date, order status, payment method, or location. This tool will help you focus only on relevant orders, avoiding the export of unnecessary records.
BulkFlow takes this further by allowing more advanced customization, in which you can select exactly which fields to include: customer details, product variants, custom tags, payment status, and more. This fine-tuned control saves time processing data and improves the quality of your Shopify export orders CSV or Excel files.
Secure and back up your exported files
Since exported orders contain sensitive customer and transactional information, it is critical to handle these files securely. Merchants should limit file access to trusted staff, use encrypted storage solutions, and avoid sharing files via insecure channels.
Additionally, store owners should always maintain backups of exported data in a safe location to protect against accidental loss or corruption. Having a historical archive also simplifies data recovery when needed.
Schedule regular and automated order exports
Another thing you should do is keep your data current and reduce manual work by scheduling regular order exports depending on business needs. Regular exports prevent data backlogs and provide consistent snapshots of your business performance.
Shopify’s default doesn’t support this feature. But don’t worry, third-party apps like BulkFlow can help streamline this process by making Shopify export orders automatically in the background so you always have up-to-date information without lifting a finger.
Shopify Export Orders – FAQs
Can I export Shopify orders based on specific date ranges or statuses?
Yes, Shopify allows you to filter orders by date, status, payment method, and more before exporting. This helps you download only the relevant orders for a given timeframe or operational need, making reports more targeted and manageable.
How can I automate the export of Shopify orders?
You can automate Shopify export orders directly to your email, cloud storage, or external systems using BulkFlow in just 4 easy steps:
Step 1: Set up Bulkflow app
Step 2: Create a feed for order export Shopify
Step 3: Configure and schedule automated export
Step 4: Export and monitor order data
What should I do if I have a large number of orders to export at once?
If you need to export a large order volume via Shopify’s default export tool, consider splitting your export into smaller batches to avoid delays. For smoother, faster handling of large or complex exports, BulkFlow is highly recommended as it can manage bulk data efficiently without the default limitations.
Final Words
Shopify export orders don’t have to be complicated. Whether you’re doing it manually through Shopify’s default export tool or automating the process with BulkFlow, exporting orders helps you manage your store more effectively.
BulkFlow takes your data management a step further by supporting a wide range of data types beyond just orders. You can easily import, update, and export data related to products, customers, orders, pages, discounts, and more. It supports multiple file formats like CSV, Excel, Google Sheets, and XML, giving you flexibility in working with your data sources.
With BulkFlow, you gain complete control over your data workflows, including advanced features like smart column mapping, custom field handling, and detailed filtering. Whether you need to bulk update inventory, update product data for marketing campaigns, or export orders for revenue management, BulkFlow streamlines these processes efficiently.
Take advantage of BulkFlow to keep your order data organized, accurate, and ready for your business needs right from today.


