Whether you are starting a new store on Shopify or migrating from other platforms, learning how to handle Shopify import blog posts is important for managing your blog. By doing this accurately, your store will be able to drive organic traffic and create deeper connections with customers.
This article will walk you through the effective methods for Shopify blog import so that even complete beginners can easily follow.
Shopify Import Blog Posts: 2 Popular Methods
There are 2 possible ways for store owners to import blog posts to their Shopify store: Coding with Shopify API or seeking a third-party alternative.
Using Shopify API
For those with technical skills or developer support, the Shopify API offers a direct and customizable way to import blog posts into your Shopify store. By leveraging Shopify’s Admin API, you can automate the migration process and tailor it precisely to your store’s blogging needs.
Pros
- Enable deep customization to automate complex import tasks and seamlessly connect with other business systems or workflows.
- Scale well for handling large volumes of content or managing multiple Shopify stores, making it ideal for extensive catalogs or sophisticated blog structures.
- Support integration with third-party services or internal tools, helping centralize data management and improve operational efficiency.
Cons
- Demand technical expertise in API usage, data formatting, and authentication protocols, often requiring developer involvement.
- Debugging errors or resolving mismatches during import can be intricate and challenging without programming knowledge.
- Shopify API limitations, such as rate limiting, pagination caps, and payload size restrictions, may complicate high-frequency or bulk data transfers.
Using third-party apps
Another alternative is using third-party solutions to import blog posts to Shopify. These apps significantly simplify and streamline the process of importing blog posts into Shopify, making it accessible to store owners regardless of their technical background or coding skills.
Among these, BulkFlow stands out as a top choice for efficiently handling large volumes of information, enabling importing products, customers, orders, metafields, etc. It also offers an intuitive, user-friendly interface and powerful features that preserve SEO metadata, images, and formatting throughout the importing process for data like blog posts.
BulkFlow guides you step-by-step to upload blog posts from CSV or Excel files, making bulk imports straightforward and reliable without any technical hassle. Shopify merchants will gain a seamless, no-code solution for efficient Shopify import blog posts.
Other popular apps trusted for Shopify import blog include:
- Matrixify: Known for large-scale data transfers and preserving images during migration, with flexible free and paid plans.
- MageFan: A professional-grade migration tool designed for complex content needs with strong SEO and formatting preservation.
How to Import Blog Posts to Shopify Using BulkFlow?
BulkFlow offers a streamlined, no-code platform tailored for Shopify merchants who need to bulk import/export pages, customers, products, and especially blog posts. Its flexible support for CSV, Excel, and cloud sources simplifies the entire workflow, making it accessible whether you’re a store owner or a developer.
In the following sections, you’ll find a clear step-by-step guide to Shopify import blog posts using BulkFlow in just 4 simple steps:
- Step 1: Create a new feed for Shopify blog posts import
- Step 2: Upload your blog posts file
- Step 3: Preview your blog posts file
- Step 4: Run the import and monitor progress
Step 1: Prepare your Shopify import blog posts file
Before starting, ensure BulkFlow is installed and connected to your Shopify store. You can create a BulkFlow account and connect it to your Shopify store, or install BulkFlow right from your Shopify app market.
Then, you need to prepare your blog post file. BulkFlow offers a dedicated Blog Posts Template you can use to format your blog data accurately. This template ensures your blog post fields are properly aligned with Shopify’s requirements and helps preserve important details.
To download it, open your BulkFlow dashboard and choose Download Template. You will see the option Blog Post Template, select it, and it will automatically be downloaded to your device.
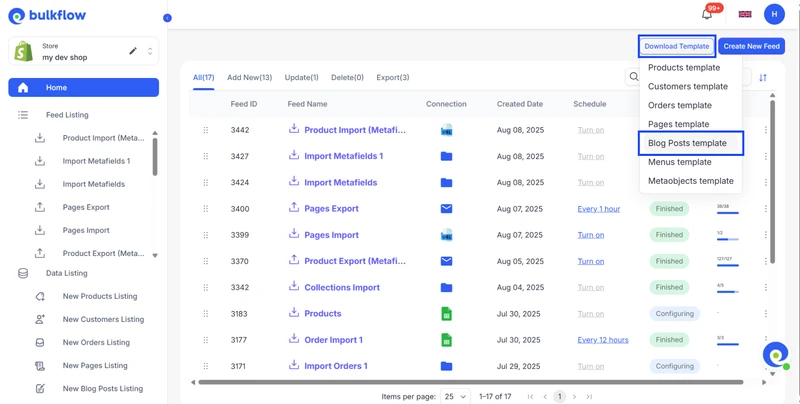
Here is how the template looks:
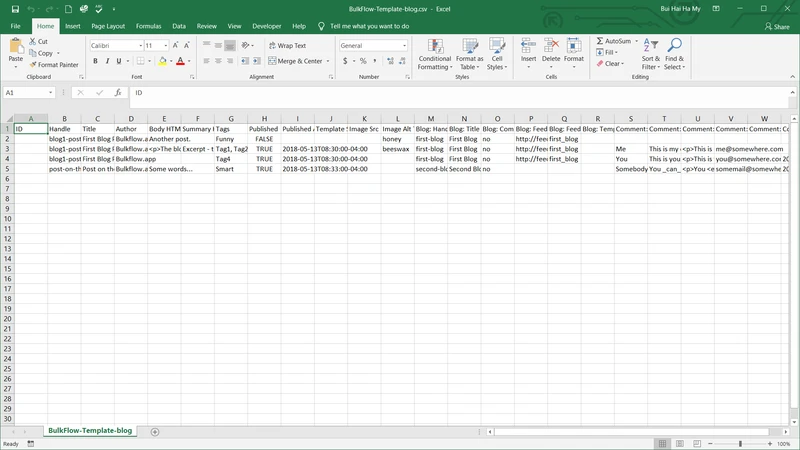
You can fill your blog data in the column based on the following instructions:
| Column | Description | Value Format & Example |
| ID | Shopify ID of the blog post (used only for updates) | Numeric (e.g., 123456789) |
| Title | Blog post title (required) | Text (e.g., How to Choose the Right Product) |
| Handle | URL slug for the post (must be unique) | Alphanumeric with hyphens (e.g., choose-right-product) |
| Author | Blog post author name | Text (e.g., John Doe) |
| Tags | Tags for categorization | Comma-separated text (e.g., tips, marketing, trends) |
| Summary HTML | Short summary of the post, in HTML | HTML/Text (e.g., <p>Quick tips…</p>) |
| Body HTML | Full content of the blog post, in HTML | HTML/Text (e.g., <h1>Welcome</h1>) |
| Blog ID | ID of the blog category in Shopify | Numeric (e.g., 456789123) |
| Blog Title | Name of the blog category | Text (e.g., News, Blog) |
| Published | Whether the post is published | TRUE / FALSE (e.g., TRUE) |
| Published At | Date/time to publish | YYYY-MM-DD HH:MM:SS UTC (e.g., 2024-02-07 15:30:00) |
| Created At | Date the post was created | YYYY-MM-DD HH:MM:SS UTC (e.g., 2024-02-05 10:00:00) |
| Updated At | Date the post was last modified | YYYY-MM-DD HH:MM:SS UTC (e.g., 2024-02-06 13:45:00) |
If you already have exported blog posts from platforms like WordPress, make sure to arrange them into this format or customize your existing CSV/Excel file accordingly.
Step 1: Create a new feed for Shopify import blog posts
From the BulkFlow home screen, click Create New Feed and then select Add New to start a new import feed.
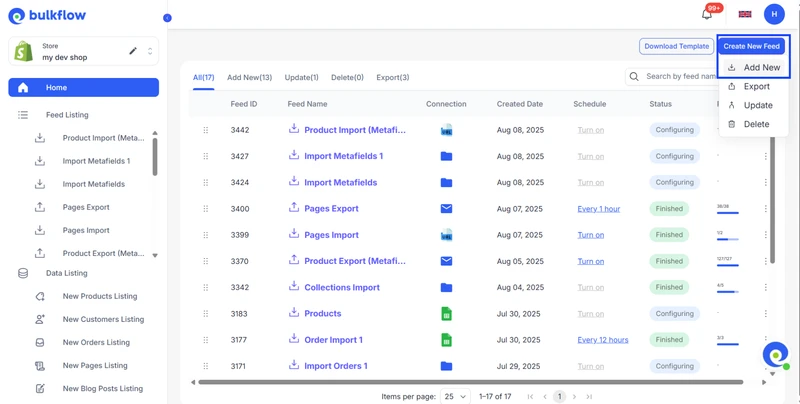
Enter a clear name for your feed. Select Blog Posts as the data entity type you want to import.
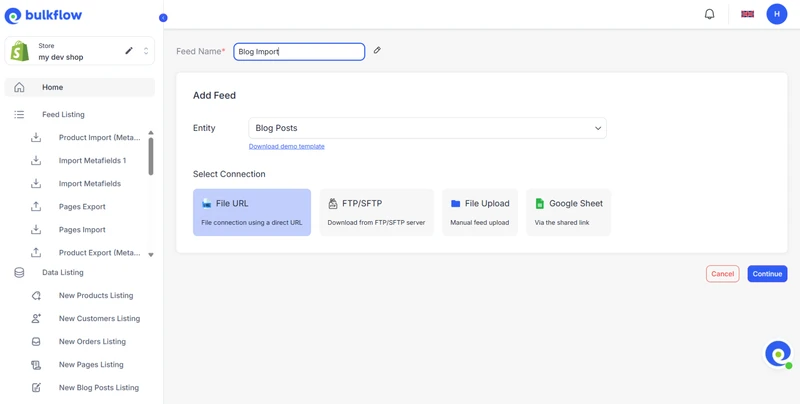
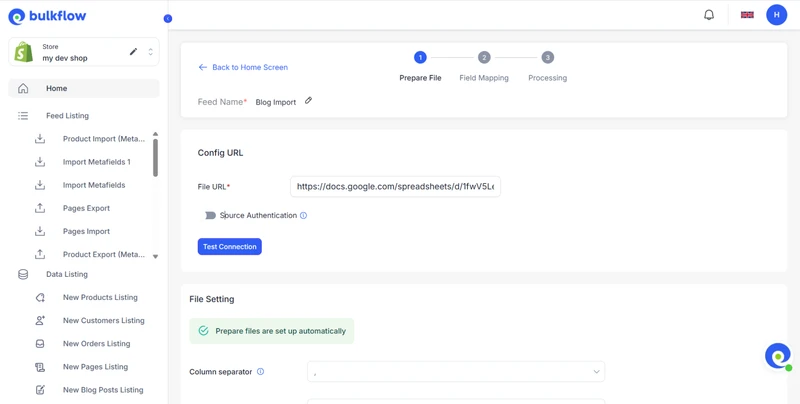
Then, choose how to connect your import file: via file upload, Google Sheets URL, FTP/SFTP, or File URL. Click Continue after making your selections.
Step 2: Upload your blog posts file
Upload your prepared data file containing the blog posts. Double-check your connection settings, and then click Next step.
Step 3: Preview your blog posts file
In this step, Bulk Flow will automatically map the fields and show you the preview.
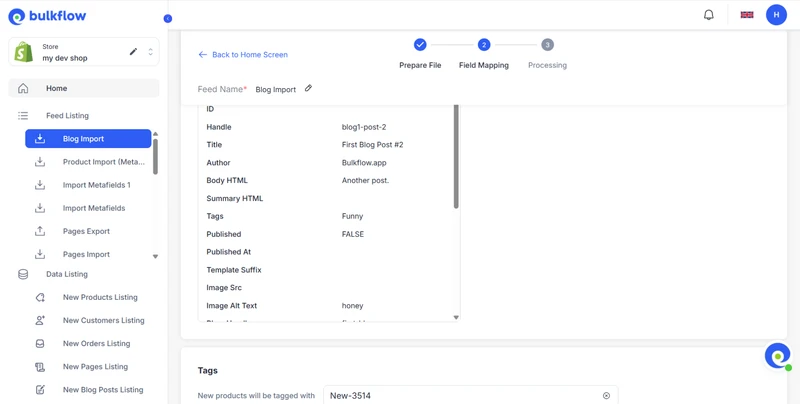
You can also configure tags to organize your blogs better.
Step 4: Run the Import and Monitor Progress
Once complete, click Next step. BulkFlow will process your file and import blog posts to Shopify directly.
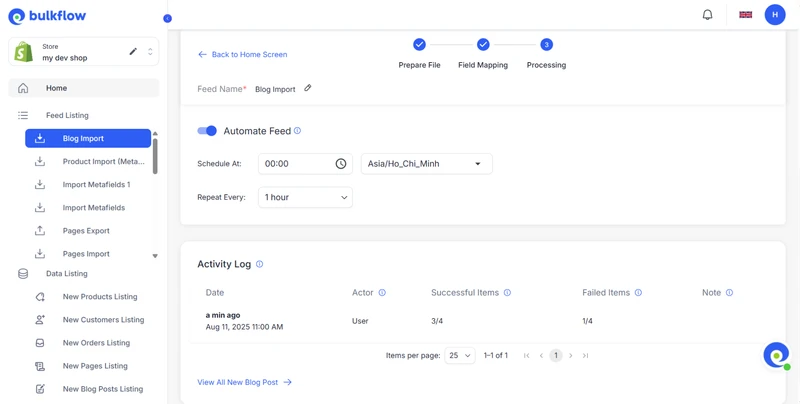
Watch the Activity Log and notifications for any errors or warnings. This allows you to troubleshoot missing fields or formatting issues quickly. You can also set up a schedule for possible future imports.
Post-Import Optimization for Shopify Blogs
Optimize SEO for your Shopify import blog
After Shopify import blog posts, make sure each blog post is optimized for search engines. Good SEO boosts your content’s visibility and attracts the right audience. Here are the key steps to enhance your blog’s SEO performance.
- Review and customize meta titles, descriptions, images, and content for each blog post to include relevant keywords while avoiding keyword stuffing
- Update and refresh your blog content to ensure it stays accurate, engaging, and relevant for your audience, while also improving its visibility in search engines
- Build internal links between related blog posts to improve site structure, user navigation, and SEO authority flow.
- Ensure your blog’s formatting uses proper heading tags (H1, H2, H3), has a user-friendly structure, and is mobile responsive to satisfy Google’s ranking criteria.
Enhance speed and performance for a better user experience
Site speed is also essential for keeping visitors engaged and improving rankings. Slow pages drive users away. Use these tips to make your Shopify blogs load faster and run smoothly.
- Compress and optimize images to reduce file sizes without loss of quality, using Shopify-compatible image optimization apps or tools.
- Avoid loading excessive third-party scripts or heavy apps affecting blog pages to minimize page load times.
- Choose a fast, lightweight Shopify theme optimized for performance, such as Dawn, Debut, or Minimal.
- Regularly test your blog’s loading speed using tools like Google PageSpeed Insights, addressing any issues with caching, redirects, or broken links to maintain fast page loads.
Plus: A Guide for Shopify Export Blog Posts
BulkFlow is also available for Shopify export blog posts, which allows you to extract blog post data into CSV or Excel files. This is useful for backups, migrations, or analytics purposes. Here is the guide on how to do it in 3 steps:
- Step 1: Create a new feed for Shopify export blog posts
- Step 2: Customize the blog post data to export
- Step 3: Run the export and monitor progress
Step 1: Create a new feed for Shopify export blog posts
Within the BulkFlow dashboard, click Create New Feed and select the Export feed type.
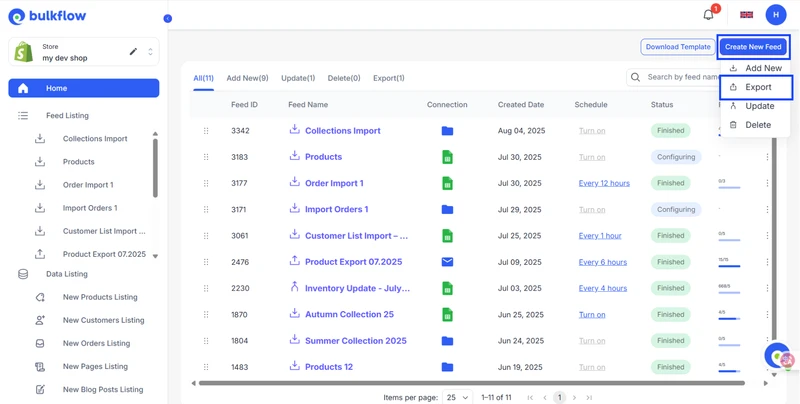
Give your export feed a clear and descriptive name. Select the preferred destination. BulkFlow offers flexible destinations for your exported data:
- Send to Email: Provide one or multiple email addresses to receive the exported file. Useful for quick sharing and access.
- FTP/SFTP: Configure your server details if you want the export file automatically uploaded to a secure server location.
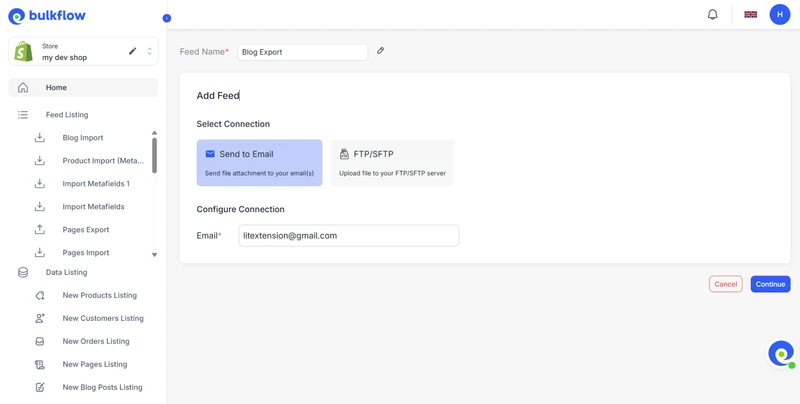
When you’re done, click Continue to proceed.
Step 2: Customize the blog post data to export
BulkFlow enables you to carefully select which blog post fields to include in your export file, depending on what you need. Important fields you should export include: ID, Title, Body HTML, Template Suffix, Image Scr, etc.
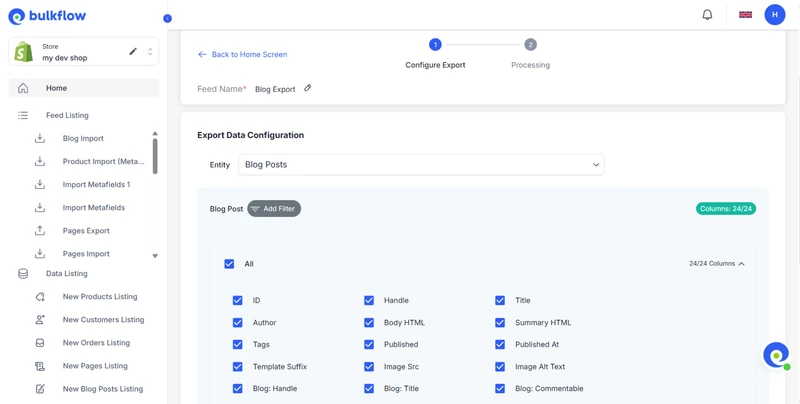
Applying filters is also possible if you want to export only posts created during a certain date range, or those tagged with specific keywords.
Step 3: Run the export and monitor progress
After setting up the export feed and fields, click the Export button to start the process. BulkFlow will collect and compile your Shopify blog posts into the chosen format.
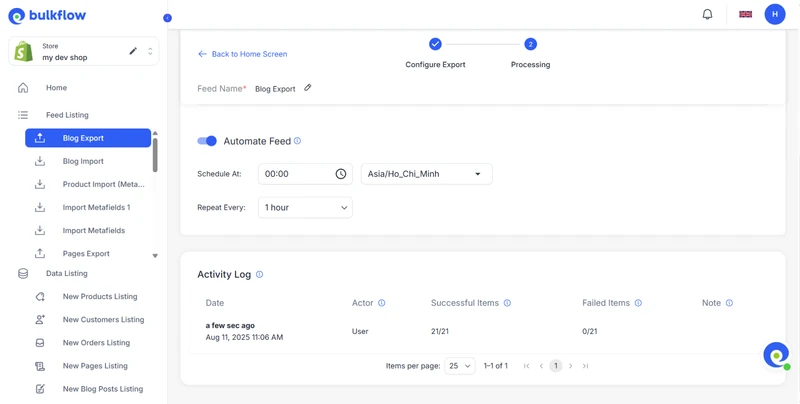
Monitor the progress and any notifications or errors on the BulkFlow activity log, especially Failed Items, to ensure all data is exported correctly.
BulkFlow also allows you to schedule automatic export blog posts Shopify. This feature is valuable if you frequently update your blog and want regular backups or ongoing data sync with other systems.
Shopify Import Blog Posts – FAQs
What’s the best way to keep my SEO rankings when moving blogs?
You need to ensure all SEO metadata (titles, descriptions, alt texts) is preserved during import and that URL redirects are properly set up from old URLs to new ones on Shopify.
Can I import blog posts directly into Shopify without an app?
Shopify doesn’t provide a built-in bulk import tool for blogs; using the Shopify API or a third-party app such as BulkFlow is necessary for efficient bulk imports.
Will images and formatting be preserved after importing to Shopify?
BulkFlow will help you preserve your blog images and formatting. Still, always verify after import to fix any discrepancies manually if needed.
Final Words
Managing your Shopify blog effectively starts with having the right tools to import and organize your content smoothly, and that is BulkFlow. Its intuitive interface, powerful features, and seamless integration with Shopify make it the easiest and most reliable way for importing customers, products, orders, and blog posts, etc., without the need for technical expertise or coding.
By choosing BulkFlow for Shopify import blog posts, you can preserve your SEO metadata, images, formatting, and publication settings, ensuring your blog retains its value and continues driving traffic after migration. Plus, BulkFlow’s automation and scheduling capabilities let you keep your blog content fresh and up to date with minimal effort.
If you want to save time, avoid migration headaches, and maintain a strong Shopify blog presence, BulkFlow is the solution to turn to. Start leveraging BulkFlow today to unlock the full potential of your Shopify blog and keep your store content strategy thriving!


