Images play an essential role in your Shopify store, but managing them can become overwhelming, especially in larger stores. Uploading one by one is time-consuming and prone to errors, which can slow down your workflow.
This is where Shopify bulk image upload comes in as a vital tool. Mastering this allows you to efficiently add or update multiple product images in a single process. This saves you valuable time, reduces mistakes, and helps maintain a consistent product presentation throughout your store.
In this guide, we’ll show you different methods and provide step-by-step instructions on how to bulk upload images to Shopify quickly and error-free.
Why Shopify Bulk Image Upload is a must for sellers?
When running an online store, speed and efficiency are everything. Shopify bulk image upload lets you add or update multiple product photos at once, no need to upload each picture manually. This means:
- Faster product launches and updates
- Reduced risk of errors or missing images
- Ability to manage large inventories with ease
- A better user experience with consistent, high-quality images across products
Whether you’re a new store setting up or an established business, mastering the bulk image upload Shopify features can save hours of work and free you up to focus on growing your business.
What to prepare before Shopify bulk upload images?
Preparation to bulk upload images to Shopify
Before you start your Shopify bulk upload images, some prep work will make everything much smoother:
Organize your images
Name your image files logically and consistently, ideally matching the product SKUs, handles, or unique product identifiers. This helps Shopify or bulk upload tools associate each image with the correct product automatically.
Shopify supports image formats like JPEG, PNG, GIF, HEIC, and WEBP. Ensure your images are saved in one of these formats for compatibility.
In addition, Shopify recommends images under 20 MB each, but optimized web images around 1200×1200 to 2048×2048 pixels strike a good balance of quality and loading speed. Large images may slow down your site and affect user experience.
Image hosting
If using a CSV for Shopify bulk image upload, you’ll need publicly accessible URLs for your images. You can upload your files to cloud hosting tools like Google Drive or Amazon S3, or use Shopify’s built-in Image Hosting.
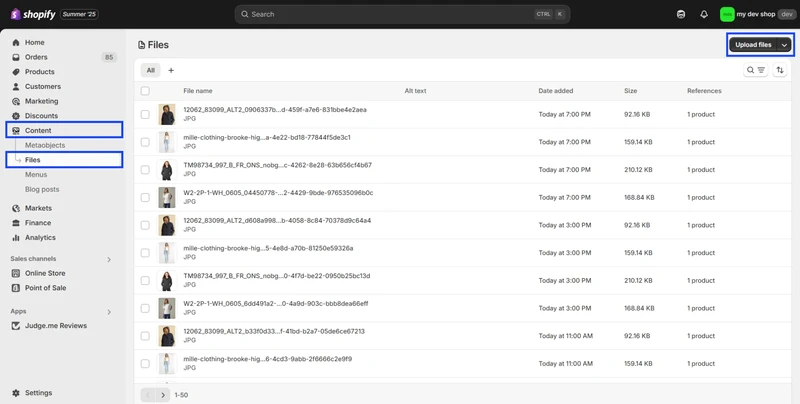
To use Shopify’s built-in tools, navigate to Shopify Admin > Content > Files. Then, click Upload files in the top-right corner to select and upload image files from your device.
CSV file preparation
If you want to bulk upload images to existing products, the common way is to export Shopify product data from your store to a CSV file. Then, you will need to fill image information in this CSV file.
If you already have an existing file, make sure to structure your CSV file correctly with columns like product Handle, Image Src (link), and Image Position. This file controls how and where images will be assigned. In this file, you should include essential columns such as:
- Handle: Unique identifier of each product (must match your Shopify product handles exactly).
- Image Src: The direct URL links for each product image.
- Image Position: Numeric order to specify image display order on product pages.
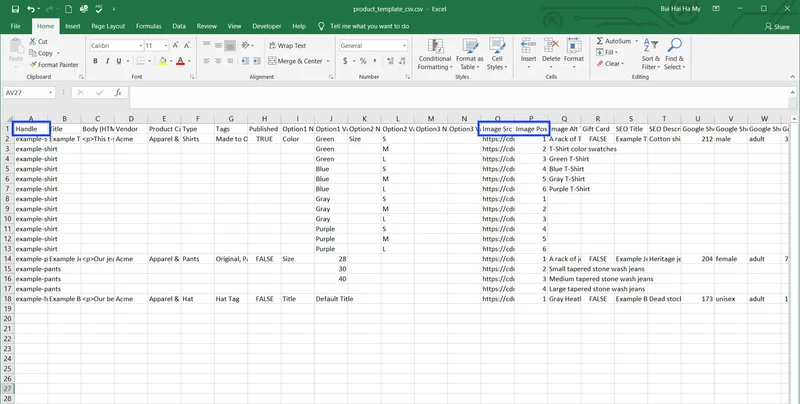
Use Shopify’s or third-party apps’ sample CSV templates as a guide to ensure your file structure meets Shopify’s requirements.
Key considerations for a successful bulk image upload Shopify
Before starting your bulk image upload on Shopify, it’s important to understand some essential factors to ensure a smooth and successful process.
- Check limitations: Shopify limits a maximum of 20 images uploaded per import and a 20 MB file size limit. Other apps may have different limitations for each price plan.
- Backup your data: Always keep backups of your CSV and images to avoid data loss and make it easy to retry if import errors occur.
- Test with a small batch: Before uploading hundreds of images, test your process with a small group to ensure everything links properly and looks great on your site.
A guide to shopify bulk image upload using Shopify’s native features
Shopify Bulk Image Upload directly through Shopify’s native tools is a cost-effective and straightforward way to manage your store’s media, especially when dealing with many products. This method primarily relies on preparing a CSV file that links your product images via URLs, and then importing that CSV into Shopify.
Step 1: Create and format your CSV file
Your CSV file must contain product identifiers, such as the product Handle, and the Image Src, which is the image URL.
If you choose Shopify File as the image hosting, you get the URL by going to Files in your Content section. There, you will see a list of media uploaded. Click the icon at the end of each image to copy the URL and paste it into your CSV file.
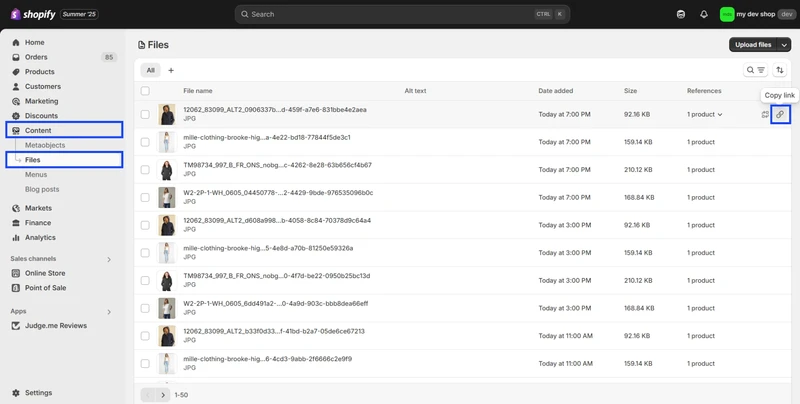
If you want to upload multiple images for one product, repeat the product’s handle with different image URLs on separate rows.
Step 2: Upload your CSV file
Next, you need to import product file to Shopify. Go to Products in your Shopify Admin and click the Import button. After that, Shopify will ask you to upload your CSV file.
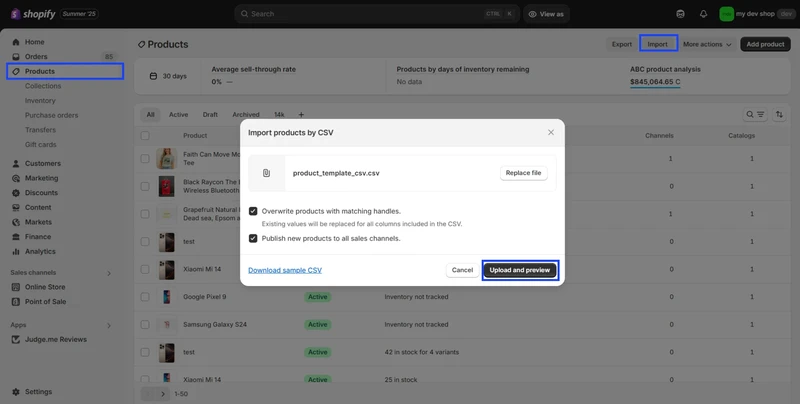
If you want to upload images for an existing product, tick Overwrite products with matching handles.
Then, click Upload and Preview to proceed the uploading process.
Step 3: Preview and bulk upload images to Shopify
After you click Upload and Preview, Shopify will show you the preview of your products with the details included in your file. Check for possible errors and fix them.
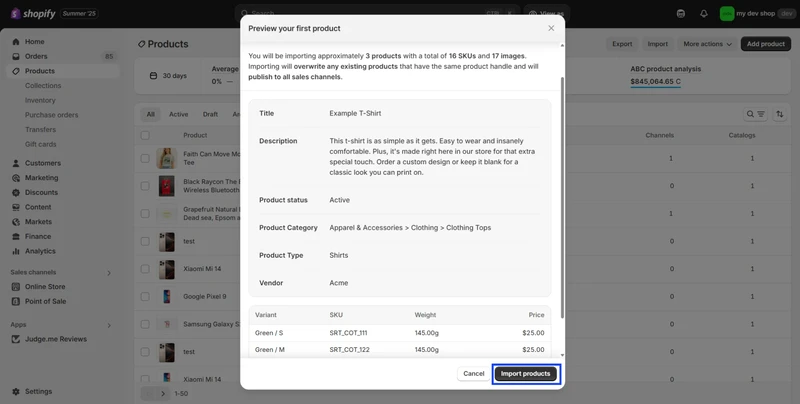
After confirming, press Import product to submit. Shopify will process the file and automatically attach the images to the right products.
How to bulk upload images to Shopify using BulkFlow
BulkFlow is a versatile app that streamlines your Shopify store management by offering a range of bulk product management options, including editing inventory, description, pricing, and more. These features empower store owners to efficiently handle large volumes of data, reducing manual work and minimizing errors.
Among its many capabilities, BulkFlow excels at Shopify bulk image upload, making it easier than ever to keep your product visuals up to date, especially for stores with large inventories or frequent image updates.
Here are the steps to bulk upload images to Shopify using BulkFlow:
- Step 1: Set up a new feed for image upload
- Step 2: Prepare and connect your image data source
- Step 3: Import and review Shopify bulk upload images
Before uploading, remember to create a BulkFlow account and connect it to your Shopify store. You can also connect your store with BulkFlow by installing our apps in your Shopify App Store (link).
Step 1: Set up a new feed for image upload
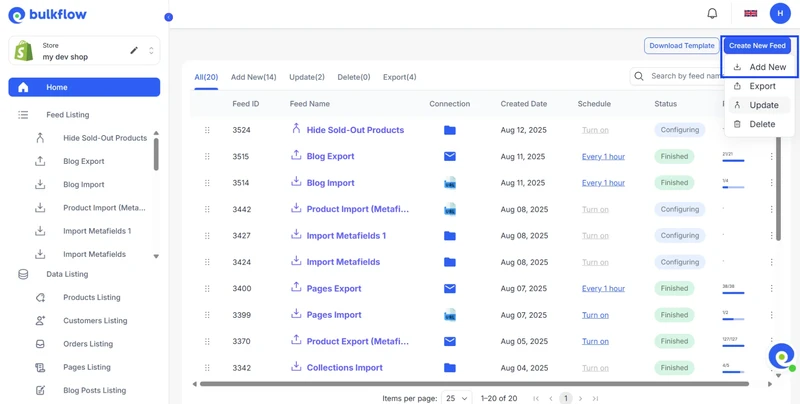
To begin, you need to create a new feed for data import. In your BulkFlow dashboard, Select Create New Feed and select Add New in the drop-down list.
Name your feed and select the type of data you want to upload: choose Products for bulk product image uploads.
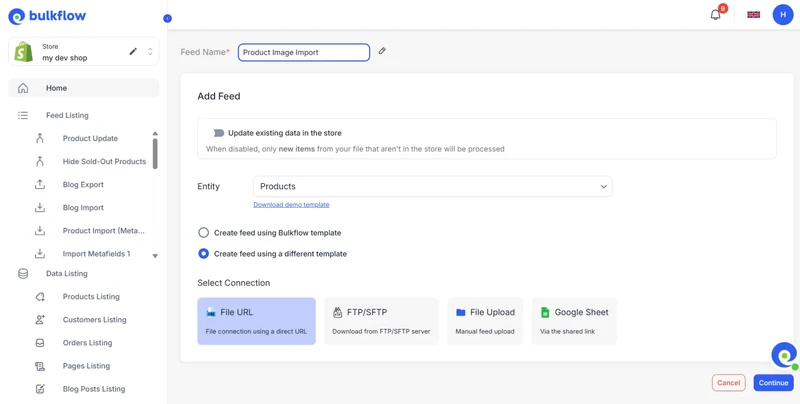
You can choose your preferred file format. If you already have your data file stored, you can upload it directly to BulkFlow without needing to make any adjustments. Otherwise, feel free to download the BulkFlow template by pressing “Download demo template” or going to Download Template > Product Template in your dashboard view.
BulkFlow supports various input methods, including direct file upload, URLs, FTP/SFTP, or Google Sheets. After setting up your feed, click Continue to proceed.
Step 2: Prepare and connect your image data source
In this step, ensure that you have your file already prepared. Similar to Shopify’s native methods, your file needs to include the necessary information about products and their images.
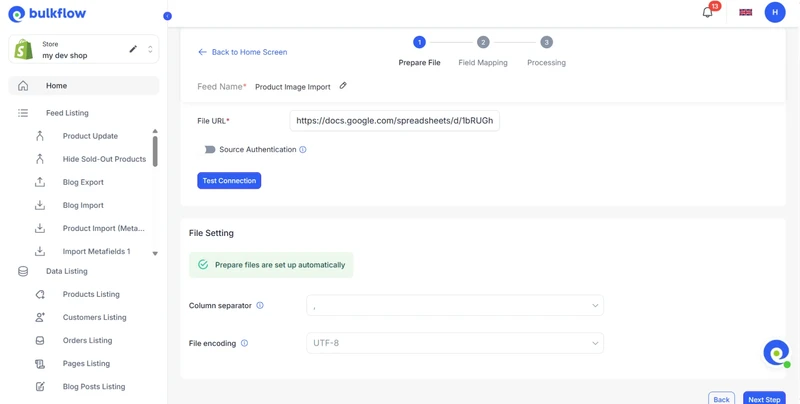
Once you have the file ready, configure your connection settings so that BulkFlow can securely access your source data. When you’re done, press Next Step.
If you use the BulkFlow template, BulkFlow will automatically do the field mapping steps for you, and you can preview how your image will be uploaded to your Shopify store.
For other templates, Bulk Flow will still analyze your data headers and attempt to map them to Shopify’s relevant fields. It also allows for manual adjustment in case you want to edit any fields.
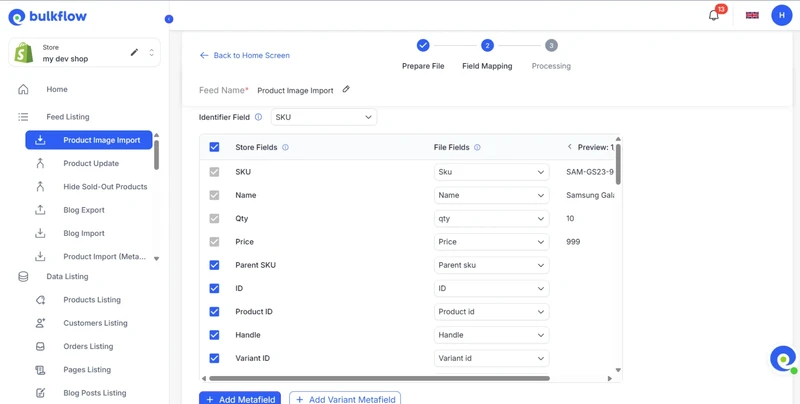
You can also adjust extra options, like selecting inventory locations, automating product publishing, or adding tags to organize your products better.
Step 3: Import and review Shopify bulk upload images
When everything is set, click Next Step to start Shopify bulk image upload. BulkFlow will upload your images and other product details to your Shopify store.
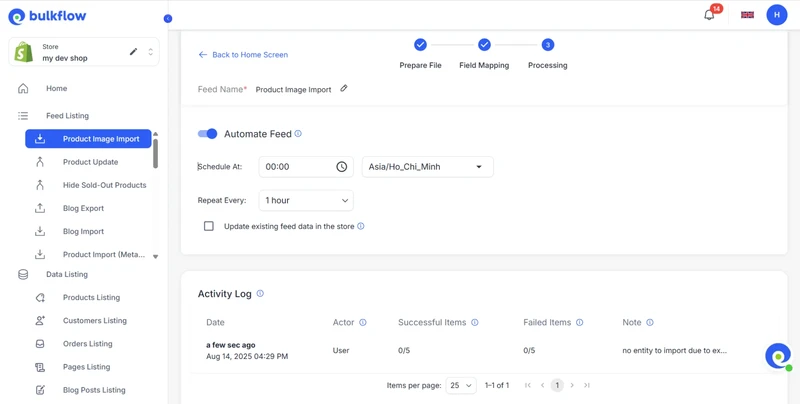
After uploading, you can set up a schedule in Automate Feed for automatic future updates or check for import details in the Activity Log.
You can also access a comprehensive table of all your imported products in your workspace by scrolling down to the end of the page and clicking “View All Products”. It will lead you to the Products Listing page for this feed.
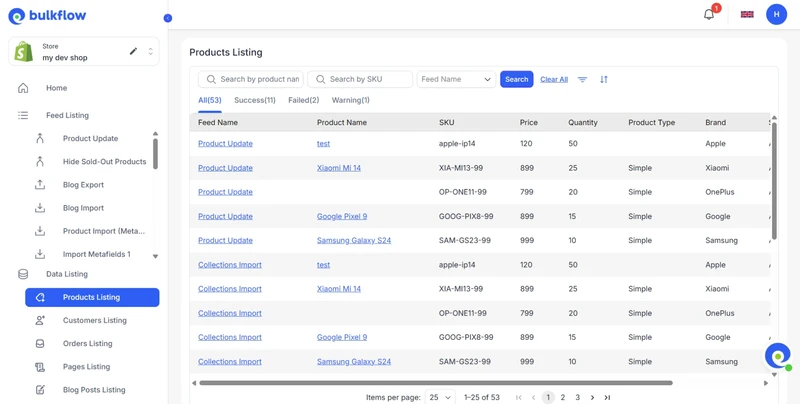
On this page, you can view the result of your imports:
- Success: The products are successfully imported
- Failed: The products are unable to import
- Warning: The products are imported, but some details need fixing
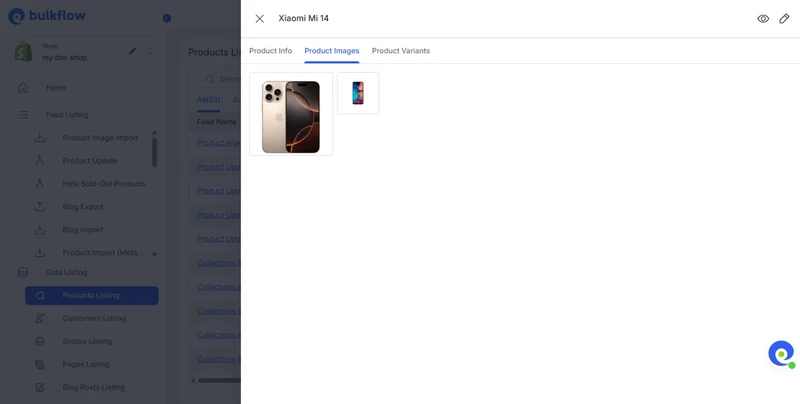
Based on this result, you can know which problems that exist and need to be fixed in the product data file. You can also click on each product to see product details, including images.
Shopify Bulk Image Upload – FAQ
Can I bulk upload images for multiple products at once in Shopify?
Yes, you can. Shopify supports bulk image upload through CSV import or third-party apps such as BulkFlow. You can upload images for many products in one process by linking images via product handles or SKUs.
How do I replace existing Shopify product images in bulk?
To replace existing Shopify product images in bulk, you can follow the steps below:
1. Export your product data via Shopify’s built-in features or BulkFlow
2. In the export file, replace the image URLs as you want. Save the changes.
3. Import the file back to your Shopify store.
What’s the best image size for Shopify bulk uploads?
Shopify recommends images up to 20 MB in size, in formats like JPEG or PNG. To optimize website speed, you should aim for web-optimized images around 2048 x 2048 pixels or smaller to balance quality and load time.
Final Words
Bulk image uploading is an essential skill for any Shopify seller aiming to scale efficiently, especially when your store needs frequent image updates. Streamlining your product image uploads not only saves time but also improves your store’s professionalism and customer experience.
BulkFlow takes bulk image uploading to the next level by offering seamless integration with Shopify and support for multiple connection methods. Other than image, it also provides features to help you import and export pages, blogs, customer, etc. Its intelligent file mapping automatically matches data fields, reducing manual work and minimizing errors.
Also, with BulkFlow’s automation and scheduling features, you can set recurring image uploads to keep your store updated without lifting a finger, ensuring consistency and accuracy across your product catalog.
Start mastering Shopify bulk image upload today with BulkFlow and watch your store management become faster and smoother!


