Ever feel overwhelmed by a cluttered product list or worried about accidentally keeping outdated items live on your Shopify store? Knowing how to delete a product on Shopify helps you maintain a sleek, professional online storefront that reflects your brand and enhances the customer experience.
In this guide, you’ll discover the methods to delete products on your Shopify store efficiently. Say goodbye to product chaos and hello to a streamlined, sales-ready store!
Should You Delete Products or Archive Products on Shopify?
Before diving in, it’s important to consider whether you should archive or delete them. Both actions remove products from your active store, but they serve different purposes.
| Aspect | Deleting Products | Archiving Products |
| Visibility | The product is permanently removed from the store and the admin | Product is hidden from the storefront but retained in the admin |
| Data preservation | All product data, including sales history, is lost | All product details, images, and sales history are kept |
| SEO impact | SEO benefits are lost; links may lead to broken pages | URL and SEO rankings remain intact |
| Recovery | Cannot be restored once deleted | Can be unarchived and made active again |
When to delete products on Shopify?
Deleting a product from Shopify permanently removes it and all its associated data from your store and admin panel – including images, variants, and inventory. Past sales data remains in reports, but product details will no longer be accessible.
Once deleted, the product cannot be restored through Shopify, meaning you’d have to recreate it from scratch if you decide to sell it again. Any links to the deleted product will break, potentially causing “page not found” errors.
Deleting is suitable when you are absolutely certain a product will never return, such as discontinued seasonal items or products permanently out of stock.
When to archive products on Shopify?
Archiving, on the other hand, hides the product from your online storefront but keeps all its data intact in your Shopify admin. This means product descriptions, images, variants, and sales data remain stored and accessible. Archiving acts like putting a product on pause, making it invisible to customers but not to store owners.
This approach is ideal for products that are temporarily out of stock, seasonal items, or those you might want to reintroduce later. Archiving protects SEO ranking because the original product URL remains valid, avoiding broken links. It also ensures that product sales history and analytics remain accessible, which is valuable for business insight.
How to Remove Products from Shopify Natively
Shopify’s native platform provides simple and straightforward methods to remove products either one at a time or in bulk. These built-in options are ideal for store owners who prefer managing their product catalog directly within the Shopify admin without relying on additional apps.
Remove products manually
Removing products manually is best when you need to delete just a few products or want to handle each deletion individually to avoid mistakes. Here is how to remove products from Shopify manually:
- Log in to your Shopify admin. Click on Products to access your full product list.
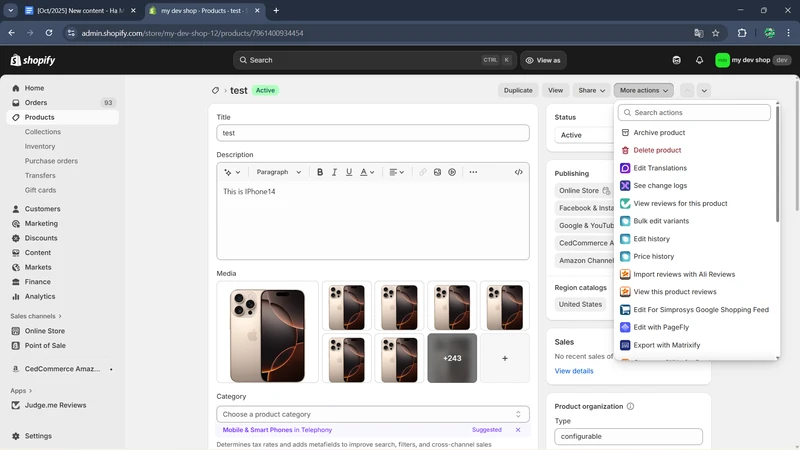
- Click on the product you want to delete. In the top right corner, click More options and choose between Delete product or Archive product.
- A confirmation window will pop up to confirm. Click Delete product or Archive product again to confirm.
Bulk remove products
When you need Shopify delete all products or multiple products simultaneously, Shopify allows bulk actions that save time and reduce repetitive work. Here is how to delete products from Shopify in bulk:
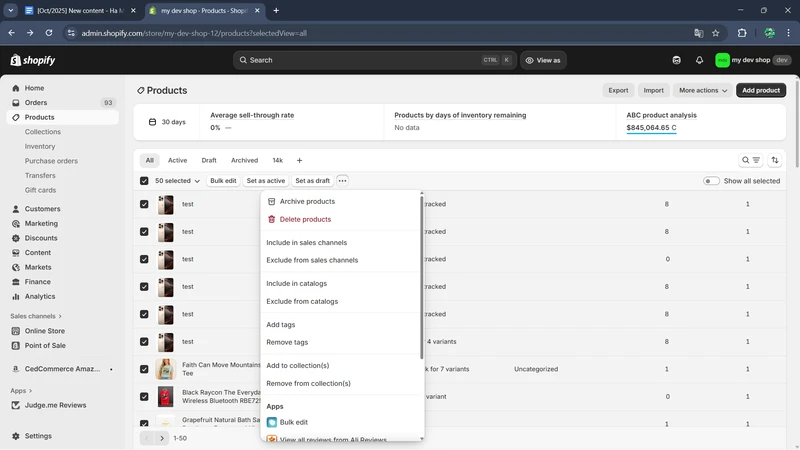
- Access your Shopify admin and click on Products. Use the checkboxes on the left side of product listings to select multiple products you want to delete.
- Once your selection is complete, click on the 3 dots “…” button above the product list and choose between Delete products or Archive products.
A confirmation box will pop up to confirm your removal. Click Delete products or Archive products again.
How to Delete a Product on Shopify Using BulkFlow
Another effective way to manage and remove multiple products on Shopify is by using product importer apps like BulkFlow. With BulkFlow, users can select the products they want to delete or archive directly in their own files, whether that’s a CSV, Excel sheet, or Google Sheet, without having to worry about reformatting to match Shopify.
BulkFlow also streamlines bulk product edit and variant edit, allowing you to delete or archive large numbers of products and variants automatically and accurately without manual work in Shopify. This can save you time and reduce errors, especially when handling large inventories.
Here is a detailed, step-by-step guide on how to delete a product on Shopify using BulkFlow:
- Step 1: Prepare for product removal
- Step 2: Create a new delete feed
- Step 3: Connect your product file to BulkFlow
- Step 4: Configure your data file
- Step 5: Launch the product removal process
Step 1: Prepare for product removal
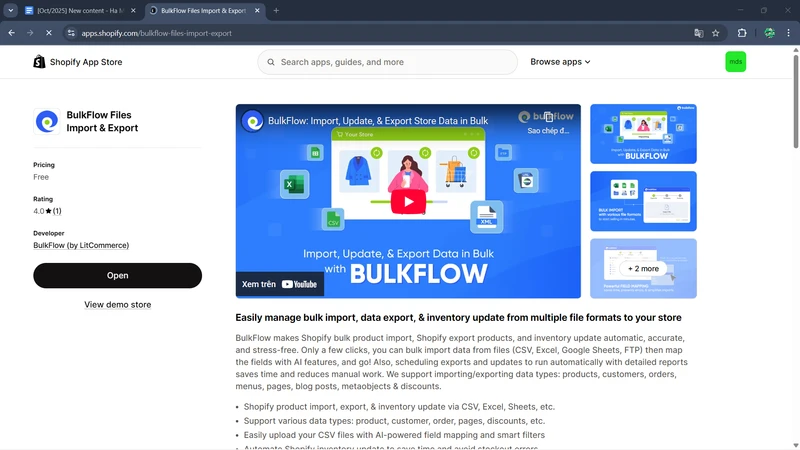
To begin, you should first install the BulkFlow app from the Shopify App Store and grant the necessary access. Another option is to create a new BulkFlow account and connect it to your Shopify store.
You also need to prepare a file containing the list of products you want to delete. In this file, you need to contain the products you want to remove with proper identifiers like product SKUs or IDs. This file could be a CSV, an Excel sheet, or a shared Google Sheets; all of them can be uploaded to BulkFlow.
Step 2: Create a new delete feed
After the preparation, you need to create a new feed within BulkFlow to process your deletion request. From the BulkFlow dashboard, click Create New Feed and choose Delete.
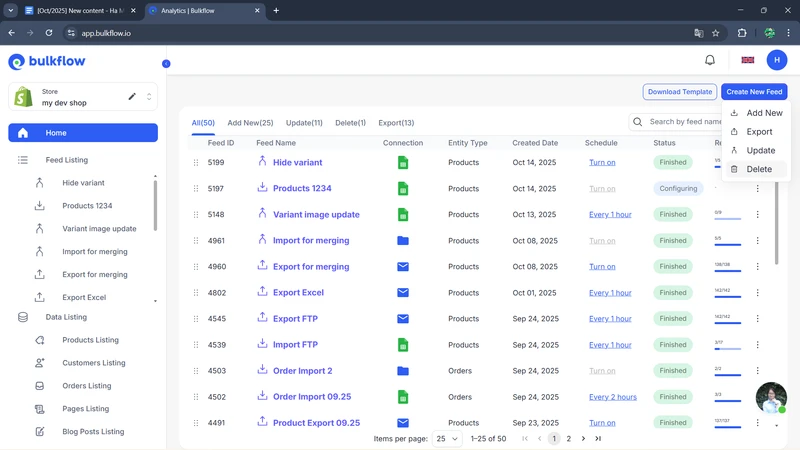
Then, give your feed a descriptive name that helps you recognize it. BulkFlow allows you to use your template or BulkFlow template. If you have an existing data file, choose Create Feed with your Template.
If not, we also provide a ready-to-use BulkFlow template to help you set up your feed quickly and accurately.BulkFlow also supports several methods to connect your product data, including file upload, file URL, FTP/SFTP, Dropbox, OneDrive, Google Drive, and Google Sheets integration.
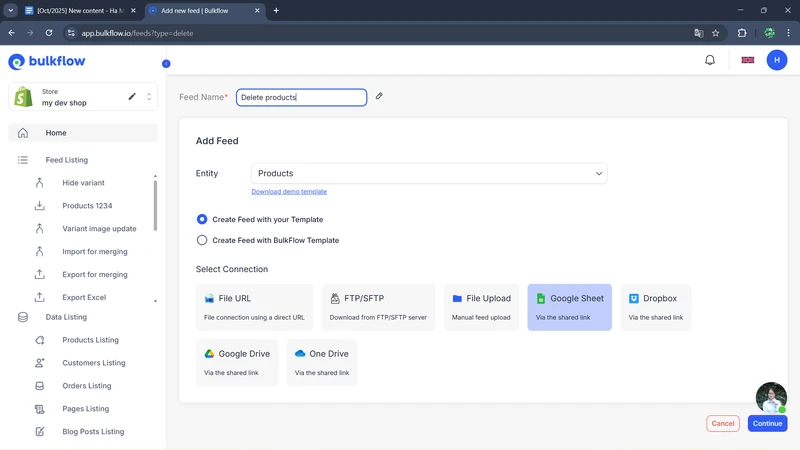
When you’re done, click Continue to move on.
Step 3: Connect your product file to BulkFlow
In the next step, BulkFlow will ask you to connect your file to it.
- If you use file upload, simply upload it from your computer.
- If you use FTP/SFTP, you need to enter the required server credentials and click Test Connection to confirm access.
- For shared connections like Google Drive, OneDrive, Dropbox, paste your file link and click Test Connection to verify BulkFlow access.
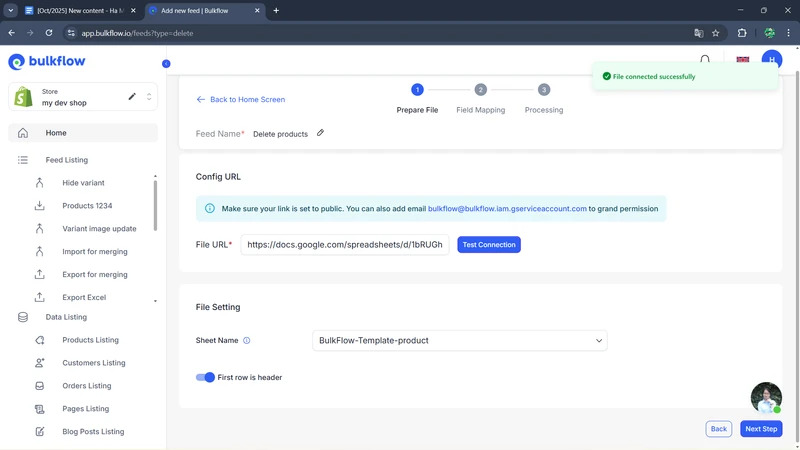
Once confirmed, proceed by clicking Next step.
Step 4: Configure your data file
In this step, you need to map your chosen product identifiers (either IDs, SKUs, Handle,…) to the corresponding identifier on Shopify. This is to make sure BulkFlow identifies the correct products to remove from your store.
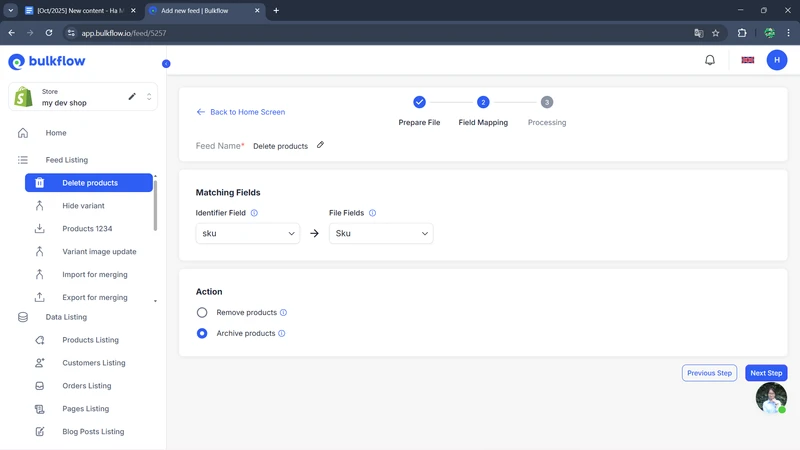
Step 5: Launch the product removal process
After you are done configuring, you can start the removal process by clicking the Next step button.
When the process is completed, there are 2 sections you can work with in the result pages
- Automate feed: You can set a schedule to automate future product removal, reduce manual work (this doesn’t work for file upload methods).
- Activity log: Here, you can see the status of this removal and also future ones. Fields you should pay attention to are Successful items and Failed items.
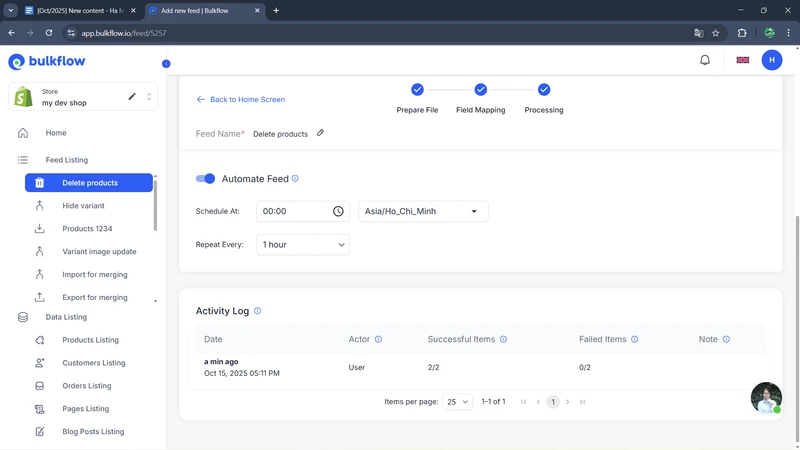
Moreover, it’s good practice to double-check your Shopify admin to confirm that the intended products have been removed.
Shopify Delete Product Common Issues
While deleting products on Shopify generally seems straightforward, many store owners still encounter some common obstacles that can make the process confusing or frustrating. Here are some of the problems you may face:
Cannot delete products
One typical problem many Shopify store owners face is that they cannot bulk delete a large number of products at once. Shopify’s native bulk deletion tool can struggle or time out when handling extensive catalogs with hundreds or thousands of items. This limitation can cause the deletion process to hang or fail, leaving you stuck midway.
To solve this, consider splitting your product list into smaller batches before attempting deletion. Alternatively, using specialized apps like BulkFlow, designed for bulk operation, can efficiently handle large product numbers with ease, making the process faster and more reliable.
Delete the wrong product
Accidentally deleting the wrong product is a very real risk, especially if your store has many similar items or if your product naming is unclear. Once a product is deleted, it cannot be restored through Shopify, so mistakes can be costly and time-consuming to fix.
To minimize this risk, ensure your products have clear, consistent naming conventions to distinguish them easily. You should also always double-check and confirm the products selected for deletion before finalizing the action. As an extra safety measure, consider backing up your product data regularly or archiving products instead of deleting them completely.
Deleted products reappear
Sometimes you might notice that products you thought you deleted suddenly reappear in your store or admin panel. This usually happens because of syncing issues with third-party apps, which might republish deleted items automatically.
If this happens, it is important to review your app and marketplace settings carefully to identify any automated sync or integration features that may be causing products to reappear. Disabling or adjusting these settings should prevent deleted products from repopulating your store.
FAQ – Shopify Delete Product
Can I restore deleted products on Shopify?
No, once a product is deleted from Shopify, it is permanently removed and cannot be restored. To avoid accidental loss, it’s recommended to back up your product data before deleting. If you think you might want the product later, consider archiving it instead to retain the data without displaying it in your store.
How to remove product from Shopify store without affecting sales history?
You don’t have to worry about that, because deleting a product does not affect your sales history or past orders. Any previous sales data involving the deleted product will remain intact and accessible for reporting. However, the product itself will no longer appear in your product listings or inventory.
Can I delete a variant in a product?
Yes, Shopify allows you to delete individual variants within a product without deleting the entire product. This can be useful if only certain options or sizes are no longer available. You can manage variants directly within the product editing page in your Shopify admin.
Will deleted products appear in your past order?
Yes, deleted products will still appear in past order records and reports to maintain accurate historical data. Shopify retains order information even after products are deleted to ensure order consistency. This is important for accounting and customer service purposes.
Final Thoughts
Understanding how to delete a product on Shopify is essential for maintaining a clean and efficient online store. Whether you’re removing outdated items, cleaning up inventory, or streamlining your catalog, taking a thoughtful approach will help you avoid costly mistakes and keep your store running smoothly.
Remember, deleting products is permanent – so consider archiving if you might need the data later. Whatever you choose, leveraging smart tools like BulkFlow can transform this process from a tedious chore into an opportunity for precision and efficiency.


