Tags in Shopify are powerful tools that help merchants organize products and streamline store management. Knowing how to bulk add tags Shopify can drastically improve your workflow, making product grouping, filtering, and search easier for both you and your customers.
In this article, we will provide you with a thorough explanation of Shopify tags and practical methods to add them in bulk, boosting your store’s efficiency.
Before diving into the detailed tutorials, it’s important to understand what tags are and how they function.
Shopify tags are labels you can assign to various store elements such as products, collections, orders, customers, and blog posts. These tags serve several key purposes.
- Organizing products: Tags help keep your store’s backend well-structured, making inventory management and other administrative tasks more efficient.
- Improve searchability: They enhance your ability to filter and locate products quickly within the Shopify admin by serving as searchable keywords.
- Enhance customer experience: On the storefront, tags can categorize products, allowing customers to browse and filter items easily, improving their overall shopping journey.
For example, if you sell t-shirts, you might tag a product with “cotton” and “summer collection.” This way, in the backend, you can quickly categorize products with similar tags for inventory checks, and on the storefront, customers can filter the summer collection or see all cotton tees, streamlining their shopping experience.
Shopify offers basic built-in options for bulk adding tags to multiple products, allowing you to do so directly from your Shopify admin interface or via CSV file editing. These default methods are straightforward and require no additional apps, making them suitable for stores with smaller catalogs or infrequent tag updates.
Method 1: Use Shopify bulk tag editor
Shopify’s Bulk Editor is a built-in tool that lets you edit tags on multiple products at once through a spreadsheet-like interface in the admin dashboard. It’s easy to use and requires no additional apps or technical skills.
- Go to Shopify Admin > Products, and select the products you want to edit by checking the boxes next to them.
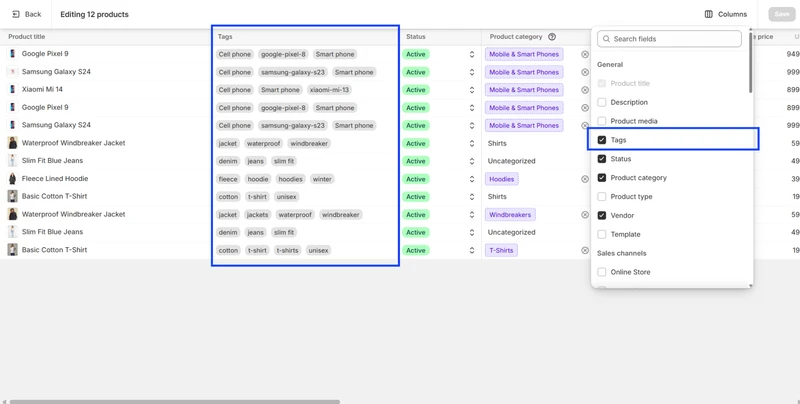
- Click the Bulk edit button and open the editing view in the form of a table.
- Click the column button, choose the Tags field to add it to your table. Add tags according to your needs.
- Click Save to apply your changes.
Method 2: Use a CSV file
This method involves exporting your product list as a file, editing tags offline, then re-uploading the updated file. This approach is more flexible and scalable for large inventories.
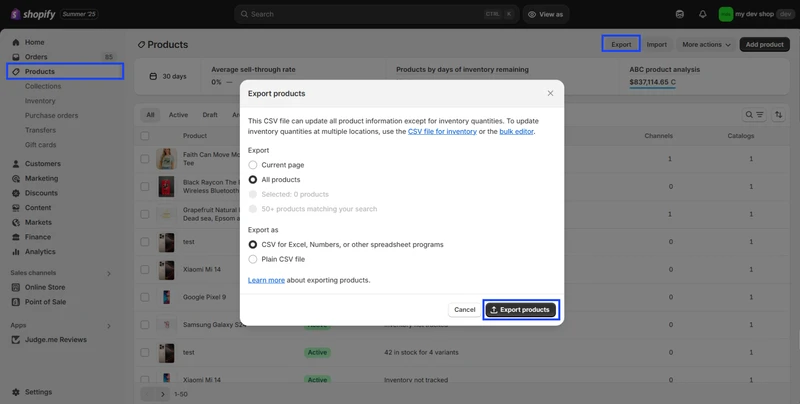
- Export your products from Shopify Admin > Products and open the file in a spreadsheet editor.
- Locate the Tags column, then add or remove tags as needed for each product, ensuring tags are comma-separated.
- Save the file. Import that CSV file back into Shopify via Products > Import to update existing products.
Should we use Shopify’s defaults?
It’s undeniable that Shopify’s default methods are useful tools for quick and straightforward tag management. They offer a free, no-installation method to add tags across multiple products, making them a suitable choice for small to medium-sized stores or those requiring occasional updates.
Shopify bulk tag editor allows you to select products and add tags directly within the Shopify admin, making it convenient for minor updates. However, it becomes cumbersome and inefficient when dealing with large inventories, as the process is mostly manual.
Shopify add tags in bulk via CSV gives you more control and scalability; it’s great for handling thousands of products in one go. However, it requires careful file handling as mistakes in the CSV can result in data loss or product misconfiguration. Additionally, it’s a relatively slow process since you need to export, modify, and re-import files every update.
Additionally, as an importing/editing tool, Shopify Admin has a limitation: it only supports limited data types. Beyond basic ones like tags, they don’t allow importing reviews or complex metafields, metaobjects, limiting operational flexibility.
Because of these drawbacks, relying solely on default tools for bulk add tags Shopify may not suit stores with large catalogs, frequent tag updates, or complex operational needs.
Alternative: Third-party solutions
To overcome the limitations of the default bulk add tags Shopify tools, third-party apps offer much more powerful, flexible, and automated solutions. They save time, reduce errors, support scheduling, and handle large catalogs effortlessly, making them essential for fast-growing or complex stores.
Among them, BulkFlow is a leading app designed specifically to simplify and enhance bulk product data management for Shopify stores by letting you import/export collections, prices, descriptions, and especially tags. It allows you to upload data from multiple sources, such as CSV, Excel, Google Sheets, all with just a few clicks.
With BulkFlow, you can create update feeds that automatically perform Shopify add tags in bulk without manual repetition. Its intuitive field-mapping feature automatically matches your data columns to Shopify’s tag fields, reducing errors even if you use your own file formats. The app supports scheduling, so you can plan tag updates ahead, freeing up valuable time.
Besides Shopify bulk add tags, BulkFlow enables comprehensive product data updates, such as uploading images, prices, inventories, metafields, descriptions, and more. This gives you full control over your product catalog with minimal effort. Not just product data
By using BulkFlow, you gain a scalable, reliable, and user-friendly solution that handles your tagging needs and broader data management across Shopify and other eCommerce platforms.
Other recommended apps:
- Matrixify: A powerful app that offers robust CSV/Excel import and export with advanced bulk editing capabilities, including tags. Great for complex bulk operations.
- MESA: A platform focuses on AI-powered workflows that help you bulk add or remove data.
- Mixtable: An online spreadsheet trusted by leading Shopify stores to bulk edit, analyze, and export Shopify data.
BulkFlow offers a seamless and efficient way to bulk add tags to your Shopify products, especially suited for stores with large inventories or frequent updates. Here is a detailed step-by-step guide to help you add tags using BulkFlow:
- Step 1: Connect your store and prepare your file
- Step 2: Create a new feed for Shopify bulk add tags
- Step 3: Upload your file and field mapping
- Step 4: Run the import and monitor results
Step 1: Connect your store and prepare your file
Start by setting up a BulkFlow account and connecting it to your Shopify store. You can also install and connect the BulkFlow app directly from your Shopify Admin (link Shopify App).
Then, make sure your data file is ready. You can get the file by exporting product data from your Shopify store using default tools or BulkFlow.
Using BulkFlow to export is highly recommended as it allows you to select only the important fields, thus saving you time and effort. It also reduces the risk of accidentally altering or corrupting other product information.
When exporting your product data, make sure you include a unique product identifier such as SKU, Product ID, or Handle, along with the Tags column. These identifiers allow Shopify to match the imported data to each product. In the exported file, you only need to add the new tags in the Tags column.
If you have an existing file, BulkFlow also supports uploading it without the need to reformat it to meet Shopify’s requirements.
To bulk add tags for your existing products on Shopify, create a new feed for update, in the BulkFlow dashboard, click Create New feed > Update.
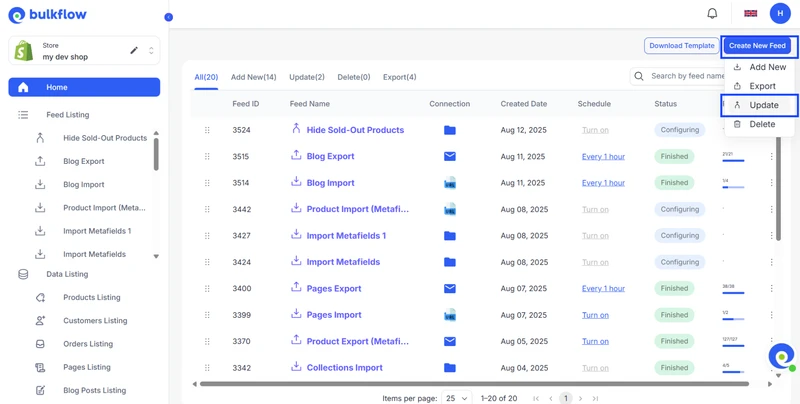
In case you want to add new products which include your tags, choose Add New instead of Update.
After the feed setup appears, make sure you give your feed a distinctive name and select your chosen file template (BulkFlow template or your own file) and upload format (File URL, CSV, Excel, or Google Sheet).
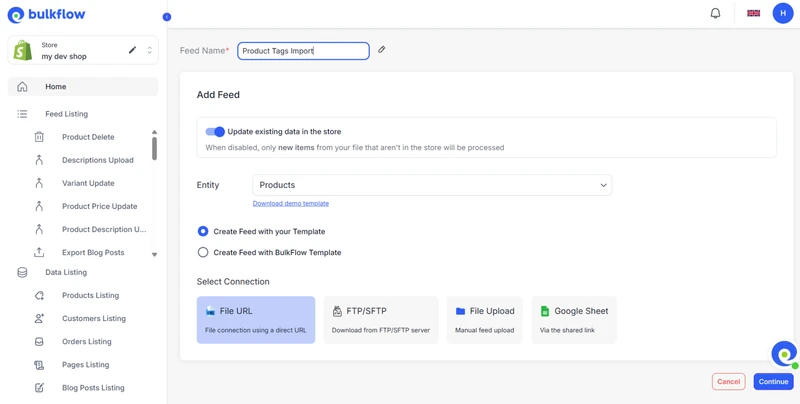
After that, click Continue to move on to the next step.
Step 3: Upload your file and map the fields
Next up will be the importing process. You will be asked to upload your prepared file according to the chosen method. BulkFlow will validate and preview the file to catch any formatting errors.
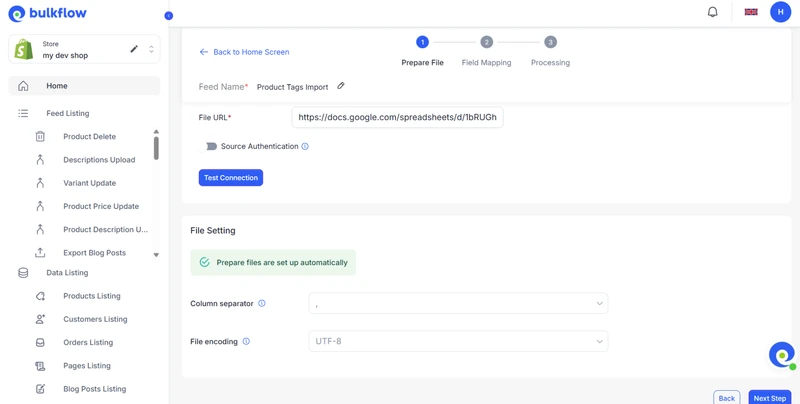
When it’s done, click Next step to move on to field mapping.
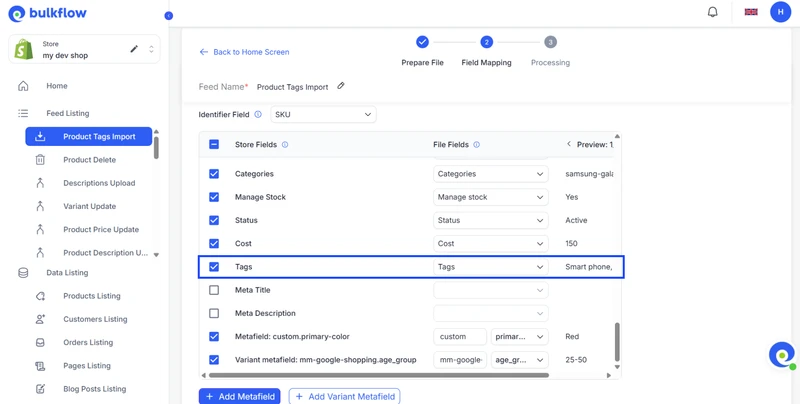
Using BulkFlow template will help you skip this task as it will be done automatically.
On the other hand, if you use your own file, BulkFlow will still analyse the headers and map them to BulkFlow’s fields, and also allows you to adjust them flexibly to ensure the highest accuracy. Ensure that your tags column is mapped correctly here before moving on.
Step 4: Run the import and monitor results
Once everything is set up, start bulk add tags Shopify by clicking Next Step. BulkFlow will process your file, adding tags efficiently across all specified products.
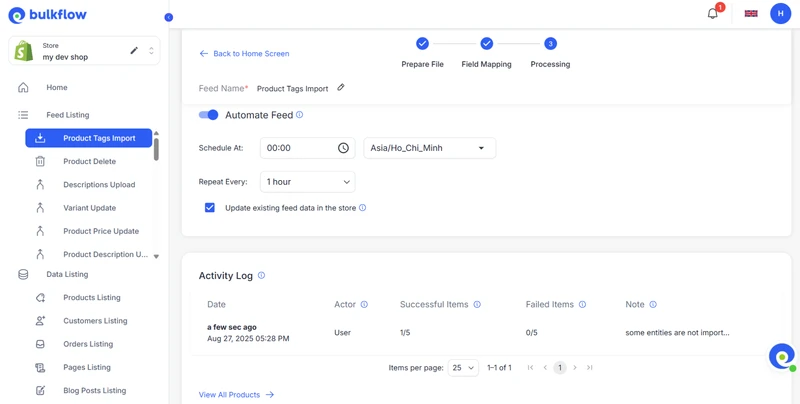
When the process is complete, you can track the result in the Activity Log for any errors or failed products. You can also check the tags that are added to your products on your Shopify admin.
You can also adjust your setup schedule for the future if your store requires regular, automated updates to reduce manual work and keep your product data consistently up to date.
Bulk editing tags lets you quickly update tags on many products at once, while bulk deleting removes unwanted tags. Both activities save time and help keep your store organized. You can do this easily and automatically via BulkFlow.
Shopify bulk edit tags with BulkFlow lets you update or replace product tags quickly without the risks of manual mistakes. Here are the steps:
- Prepare a data file including product identifiers and the updated tags you want to apply.
- On BulkFlow, select Create a feed > Update to create a new feed for bulk edit tags Shopify, choose the feed name, file template, and upload format.
- Upload the file to BulkFlow and map your tag column correctly to Shopify’s tag field.
- Run bulk edit tags Shopify. After that, review results in Activity Log and schedule automatic future tag updates if needed.
BulkFlow also simplifies Shopify bulk remove tags, saving time over manual deletion in Shopify admin. The steps are pretty similar to Shopify bulk edit tags:
- Prepare a data file listing the products you want to delete tags from. Leave the tags column blank or remove specific tags.
- In the BulkFlow dashboard, create a new feed for update, give it a name, and choose the connection methods based on your file.
- Upload your file, and BulkFlow will help you match your headers with Shopify’s. Check the preview to make sure your tags column is mapped correctly
- Run the upload. When it’s completed, monitor the update status in Activity Log and schedule automatic future tag updates if needed.
Each product in Shopify can have up to 250 tags, which provides lots of flexibility for categorization.
You can perform Shopify bulk remove tags using Shopify’s default tools. For larger inventories and more seamless workflow, third-party apps like BulkFlow enable you to remove tags while minimizing manual work and errors.
Yes, tags updated within Shopify automatically sync across all connected channels, including Shopify POS, online stores, and marketplaces.
While tags don’t directly impact SEO rankings, they enhance customer navigation and filtering, improving overall user experience. Well-organized tags help customers find products easily, which can increase engagement and sales.
Final Words
Tags play a crucial role in organizing your Shopify store, improving both backend management and customer shopping experience. Using BulkFlow for bulk add tags Shopify takes these benefits to the next level by offering seamless automation, flexible data integration, and error-free updates.
BulkFlow not only simplifies adding tags in large volumes but also helps manage descriptions, inventory, metafields, and more, streamlining your entire product data workflow. For Shopify merchants serious about scaling and maintaining a well-organized store efficiently, BulkFlow is an indispensable tool.
Start using BulkFlow today to transform your tag management and elevate your store’s organization and customer experience like never before.


